Showing posts with label scratch build. Show all posts

Monday, October 16, 2023

Tool Time

You will see the new name and web address for the blog and wonder what’s going on. 
Those with long memories, may remember that my first steps in large scale modelling were in 7/8ths inch to the foot scale. But I was overwhelmed by the size and details, and stopped working in the scale long before this blog even started. 
Now that my 16mm scale layout is ready to go to shows, and I’ve absorbed what I can do in 16mm scale. I felt the need to try my hand at some 7/8ths details. I don’t know why, I just felt the need to do this. 
I found some dimensions, and made a large screwdriver, using a couple of thicknesses of styrene rod. The handle was shaped with a file from 1.6mm rod, and the shaft from .75mm rod with the flat tip sliced off with a sharp blade. The end of the handle was drilled out with a tiny drill bit, the shaft inserted, and fixed with styrene cement. All this was done under the view from an Optivisor.
A scale 18” long large screwdriver
I had made a screw driver. I had made a flipping screwdriver! A pretty good looking screwdriver at that. Bolstered by this success, I tried a spanner, (wrench to my American friends). With just as acceptable results. This was cut and shaped from a 2 x 6mm strip. The camera eye is unforgiving in the image. But to me it looks great.
A big old spanner. One for about 3” nuts and bolts.
I’m making tools! I’m starting to feel pretty good, so I carried on. Another smaller screwdriver. The screwdrivers were actually easier than I thought. I followed this with a smaller spanner. Then a couple of crowbars (pry bars) followed. These were actually quite challenging, as the styrene strip was being heat bent almost as far as it would go. Then to finish it off, a Sledgehammer, which was an absolute piece of cake considering what I’d already made. 
A 7/8ths inch scale tool wagon?
After a break for the weekend visiting friends and running in a 5K (1st in my age group, thanks for asking) I added a wood clamp and a tool box. The wood clamp was measured from one that the friends we were visiting had weathering away in their front garden. The tool box is rather more conjectural being made to a size I thought appropriate of about 18” long. Eighteen inches in 7/8th’s is about 33mm. Sizes of items are difficult to get used to.
It was a conscious decision to make the jaws of the clamp open and offset
The tool wagon, it contains full size tools I don’t even own,
There we go, a selection of 7/8ths inch to the foot tools. Made just to see if I could do it. It certainly gives me a sense of achievement. The wagon the tools rest on is the first wagons made for my abandoned 7/8ths inch layout.


Tuesday, August 29, 2023

Loading chute gets some paint.

At some point I have to stop work on the layout, and start packing my suitcase and camera bag for my holiday. But I couldn’t resist adding a few more rivets to the model (I only added rivets to the faces of the model that you will be able to see), and giving it a coat of paint. Now it looks the part. 

Weathering next. I hope I’ll have the good sense to wait until after my trip back home to do that, but I’m not making any promises there. 
 

Monday, August 28, 2023

Riveting work

Just a short report today. As I’m packing and getting ready for our vacation in the U.K. starting on Sunday. I just booked a couple of tickets for return trips on the Ffestiniog and Tal-y-lyn railways for our days in North Wales. 
One detail that I’d decided to incorporate on the skip loading chute was rivets on the girders. Sixteen millimeter scale is large enough to warrant this level of detail. I had no idea what to use for the rivet heads, but a quick ask around some forums and tiny rhinestone jewels used for decorating fingernails was suggested. I bought a pack from Amazon. 7,200 of various sizes between 1 and 3mm for $8.99 should keep me going for a while.
I figured the easiest way to apply them is a dab of glue on the surface and then put them in police with tweezers. That was pretty much right. I also found that a scalpel to adjust the jewel to its correct spot was a good idea. After 30 minutes dabbing and adjusting I had one side of the loader started.
Can you see them? 
It’s certainly a fiddly job. But right now not too tedious. I certainly have plenty more to add. But it’s a good start. I also don’t doubt that someone, somewhere will tell me the correct pattern of rivet heads. But I don’t care. It creates a good effect, and that will do for me.

Friday, July 28, 2023

Day 14 (or so) Bins

What I really want to be able to do on this layout is to empty the contents of a skip into the back of a truck. A long search, accompanied by helpful advice on the NGRMOnline forum, has sourced some good ideas for suitable builders lorries to receive a load. However, one particular manufacturer is quoting 2 months delivery on an item, While another would appear to be reticent about delivering to the USA. (To be honest, I don’t blame them. The transatlantic mail service is not what it used to be.) So, I’m giving consideration to making a bin to tip into, while I wait for a lorry to arrive from wherever it may be. 
From the outset I’ve been considering the concept of tipping different grades of sands or gravels into different bins. I thought perhaps three at the start, now I think only two different grades would be needed. To that end, I started to mock up the size of bin that would be needed. I’ve no idea how this feature would translate into 16mm scale so mock ups are a must.
Mocking up the bin
As you can see, once you add the Land Rover and a bin, the area starts to fill up. I think I could only get away with the one bin on the layout. A few millimeters here and there in the size of the bin are going to  make all the difference. Proportions of height to width, are important. If you make it too tall and thin it’s going to look flimsy and like the walls could collapse under the weight of sand. Too short and fat and the sand or gravel will spill out of the bin as the amount tipped into the bin increases. 
How much gravel/sand will a bin hold? How much spillage outside the bin will there be?
A mock up and test is needed.
The bin holds a lot of sand/gravel
Successful tipping experiments
What this tells me is that despite the long drop there is no overspill. Perhaps as the bin fills up the chance of material ending up outside the receptacle would increase but right now I’ve emptied 6 skip loads into this bin and there’s no overspill. I’ve also run out of fine buff ballast so I can’t add more. I think that’s a success.
I’ll add a handle to the back of the bin so I can easily slide it rearwards off the layout to be emptied or perhaps even change it out with a lorry when it is full. All in all, a successful days work.


Tuesday, July 25, 2023

Day 12 The skip loading chute. A day of mixed fortunes.

I wasn’t expecting this to happen…
When I changed my mind about having a workshop on the layout and replacing it with a loading chute. I knew exactly what I wanted. Something akin to the one that features on David Barham’s Fen End Pit layout. I am not planning an operating dragline excavator though. 
Having a working feature like this at the front of the layout opens up interesting opportunities at a show. One could invite viewers to load the skips, thus drawing them into the world of the layout rather than just watching. 
The first mockup of the chute was well received over on the NGRMOnline forum and I got some good feedback on things to incorporate. 
As per usual, a drawing was produced, The most important thing about this drawing was it would enable me to get the size of the panels for the chute correct. Something that required me to dredge up knowledge from grammar school technical drawing classes to correctly design and build it.
A quick layout drawing of the loading chute
With the help of the drawing, progress was pretty swift. By lunchtime I was well on the way to having it completed.
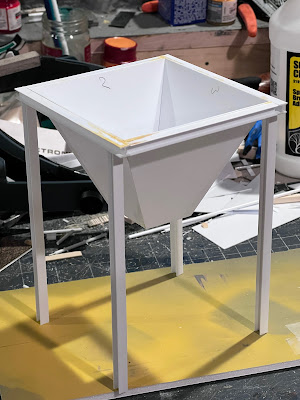
Coming along nicely
Though much of the design is inspired by the design on Fen End Pit, as I worked further on it, I decided it needed a bit more bracing between the legs to aid rigidity. Plus it would give the structure my own touch of individuality. Luckily, I did have enough right angle section to be able to do this, and as my afternoon tea break approached, things were looking very good indeed. 
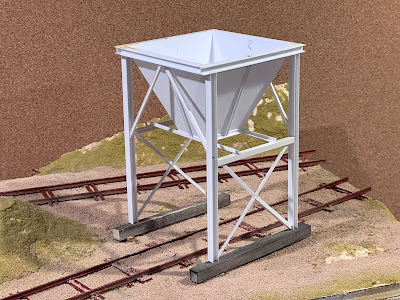
Another structure looks pretty good.
While the kettle was boiling and the tea brewing, I took it outside to give it a quick spray of primer, and then let it dry whilst I enjoyed my Earl Grey and biccies. 
Suitably refreshed, I went outside to continue priming.
OH SH!T.
A gust of breeze had got up and blown the model off the bin I had been spraying on, and it had fallen on the concrete path. To say I was shocked was an understatement.
Perhaps as a testament to my construction processes, the chute only broke into two parts. So repair shouldn’t be too difficult. But it most certainly wasn’t what I was expecting at the end of the day today. 


Monday, July 24, 2023

Day 11. Railings

I was pretty nervous about this project, so I spent quite a bit of time working out the best way to complete it. 
In smaller scales of course, you just go out and buy some fencing to suit. If there’s anything in 16mm scale I couldn’t find it. So scratch building was called for.  
I did my due diligence, researching dimensions and sizes. I wanted to use styrene tube for the posts and rail. In the end it turned out I didn’t have any tube in the size I wanted. I had lots of 2.5mm rod though, and it looked like it looked right. So rod it was. I’d just have to drill a few extra holes, that’s all. These extra holes were going to be in the end of the rod though. But as I had already drilled out rod when working on the exhaust pipe for my “Huddy” I wasn’t phased by that. The first thing I needed was a jig.
Another task, another jig.
Pretty much every job on the layout has needed a jig somewhere to aid its construction. This one was no exception. Sections of strip wood hold the rod in place, and allow me to cut the rod to the correct length. A section of the corrugated sheet that I used for the sleepers had holes drilled in it at the correct distances for the safety rails. This should, in theory, give a batch of identical fence posts, and it pretty much did.
All identical (or pretty close)
A hole was drilled in the end of the fence post, to accept a short length of .75mm rod to locate it in the deck and similar lengths of the rod were placed in the holes on the post to help locate the rails.
From then on, it was pretty simple. Yes you had to be careful, but as all the rods had been cut to the same length and drilled correctly it all went together quite easily. I didn’t even need a jig for this stage of the project. Before long I had a pretty good looking section of safety railing.
First section. Yes, I’m feeling pretty pleased with myself.
The second section was a bit more challenging. But not much. It involved a right angle turn in the railing to enable it to go partly across the end of the deck.
But simply with careful drilling and lining up of the holes the pins were easily placed to make the turn possible.
By now, I’m feeling invincible
Some holes were drilled into the deck and the safety rails were put in place for the first time…
Well, what can I say?
Even the right angle turn worked out.
A quick spray of paint to cover the white and job’s a good’ un
Needless to say. I’m feeling pretty pleased with myself. This is something I’d never needed to do before. It was something that I didn’t have the foggiest idea how to do. There may even have been an easier way to do it. Though I’m not sure that just butt jointing the sections of post and rail together would have resulted in as good a join as I have this way.
The lesson everyone can take away from this is never be afraid to try something out of your comfort zone. 

Day 10 - some thoughts

(A day late sorry)
Sometimes you don’t realize how long you spend thinking about tasks on a layout until you actually start logging your time. 
Like with these daily blog posts. I look at the work I’ve done, and yes, some of it like cutting the deck of tipping dock. Took a heck of a long time. 
But then there was the working out how to make the jig for the yard fence. I swear that measuring up and working out where all the stops and supports went took longer than the actual assembly of the fence sections themselves. I may have already made a mock up of the wagon loading chute, but there’s a drawing being done to help me make the actual thing. The safety handrail for the dock is another thing being worked on. There’s a lot of time being spent thinking.
I have pieced together several drawings for projects for the layout. I use an app called Graphic. They help me visualize the construction and any problems that might occur. They may, or may not, depending on the structure, be to scale. They may, or may not, depending on the finished model be an accurate copy of the prototype.
Tipper shelter, so many things to work out. So much head scratching.

A drawing for the tipper shelter was a case in point. It was an absolute must. The prototype was so flimsy there was little to go on from the prototype photo. In fact the whole thing didn’t come fully together until I worked out how to make it stand up by itself. Which I couldn’t do until I saw the finished shelter.
A full size drawing didn’t help work out how to stand the shelter up.
The Handrail is not a difficult task. Not compared to the shelter or the forthcoming loading chute but it still needs a drawing.
Handrail details
I need to visualize how to actually construct the thing. How do I fix the rails to the posts? How do I fix the posts to the deck? This quick visualization explores the idea of the construction of posts from styrene tube, with a section of rod glued inside them as pins to locate them in the deck. Similarly, the rails will be located in place thanks to pins through the posts. Now I need to spend more time figuring out the jig to drill the holes in the correct place. I hope that once I get through this next batch of thinking time I’ll be able to get started on the handrails soon.


Saturday, July 22, 2023

Day 9

After a little respite yesterday to review one weeks work. It’s time to move on again. I will try set out with the aim of working on an item for the layout a day. Working during the week on bite sized chunks to keep things progressing. There’s things like the fence, the handrail around the tipping deck, things like that. To that end I decided to start with the short section of fence around the end of the dock. It was simple enough to find drawings on the internet that showed the dimensions of a simple three rail fence. 
First up I needed a couple of simple jigs to get the same sized parts to fit the same way.
It might not look like much, but this simple arrangement of stripwood and foamcore board is the key to getting all the parts to fit.

This is how it holds all the parts together.

The assembled fence. Next a quick wash with alcohol/India ink.

In place and ready to be bedded in
One more simple job done.

Monday, July 17, 2023

Day 4.

The days seem to be rushing by. I don’t see how I could finish this in three more days. I desperately need something to come together to make me feel like I’m getting somewhere.
Today that happened. 
I’ve been cutting and staining strip wood and slicing up styrene girders for the past 2 days. I was desperate to see some progress. Today, with some jigs and a little patience, I achieved something.
Something!
The tipping dock is in a state where it looks like what it’s going to look like. It stands on its own 10 legs. I shan’t fix the deck in place until I’ve laid the rails on there. 
The superstructure is rigid thanks to all the bracing I put in place.
The underside showing all the bracing in place
After that my confidence was at a bit of a high, so I started to think about the garage/workshop. I poured over photographs of prefab garages getting a feel for how they were assembled. You can even find the instructions on the internet. For a while I gave some thought to actually making panels and assembling them like the real thing.
Perhaps not…
I mocked up a shell of the building to get the size right. I was originally going with a scale 16’ long building bit I felt it was too long. So I decided a 12’ structure would fit the bill.
A slightly smaller structure than planned. But all is good.
All in all a good day. A confidence building day. I’m looking forward to getting a lot more done in the next couple of days.
 

Sunday, July 16, 2023

Day 3.

 I left the decking overnight hoping that it would be likable in the morning. It wasn’t. I gave it another wash of a lighter grey to kill the blue tinge of the darker wash. Then let that dry. 
It’s not too bad now
It’s better now. I’m looking at it from directly above, an angle no-one will see it from. 
While this dried, I started work on on the legs and support frame. I have expended much brain power on working out the best way to assemble all my sections of Plastruct girder to make something that looks like the prototype. I figured a pattern of some sort was in order to make enough identical supports.

After a few hours I had five pretty identical legs.

This may well look like a wooden fence, (something to bear in mind for the future) but it is actually the timber deck for the tipping dock.

Another day finished. I expect tomorrow I’ll have to lay the rails on the decking before assembling the substructure. What else will I have time for?

Wednesday, July 12, 2023

Tipping Talk

There’s only two structures on the layout. The garage/workshop and the tipping dock. The garage/workshop was outlined in the previous post. Now let’s discuss the tipping dock.
I was inspired to build the layout by the picture in issue 134 of The Review. So the structure has to really look a lot like that. So far I have only found one other picture of it. Tucked away in the background of a photo by Gordon Edgar on Flickr
Handily, it’s an end on shot so it gives another angle on the structure. 
End on in the distance of Gordon Edgar’s photo
I scrutinized this picture and the one in The Review and I think I’ve manage to come up with an arrangement that I’m happy with. It’ll be adjusted to fit the location of course, but it captures what I’m after.
Possible arrangement of Garside’s tipping dock
I think it looks like a quite passable representation of the actual thing. I’d appreciate any thoughts and feedback on my interpretation. 


Wednesday, June 28, 2023

What’s the point. Part 3.

I couldn’t leave my proof of concept work unpainted for long. A quick spray with a Tamiya Dull Red and a light earth from a couple of rattle cans then a little ballast between the track and there you go. A quite acceptable piece of work.


Tuesday, June 27, 2023

What's the point. Part 2.

 Nice and recovered after my marathon I felt ready to finish off the turnout. The onerous task facing me was the spiking of the rails. 
Some people like spiking rail, some don't. I've not decided where I sit in the two camps. I don't particularly enjoy the task. It's something I have to be in the mood to do. But it's pretty much the only way to do what I want to get the effect I'm after. Out came my spikes and spiking tool  and away I went.
All the parts ready to go. The rail is code 148. That's a LOT of rail to cut and file away to make blades and vees. That took quite some time, and all the while I was fettling them. Filing a bit here and there to make the blades fit as I assembled the track.

I started at the vee. I really should have modelled the turnout with a crossing reinforcement plate. As it would supply some support to the vee. It could have been superglues to the plate, along with parts of the wing rails, should I make another. 

The blades, a lot of filing to be done on these to get them to fit. A tie bar system will have to be devised.

Done. For now. It needs a reliable pivot system for the blades and a tie bar. There's no doubt that it looks the part. But all the filing and spiking. It's just something I need to be in the mood for.

A vee skip chassis will navigate the turnout carefully

A last look at the project.
There we are then. I'll probably call this one good and give it a rusty paint job, like I did my original section of track, and put it on a shelf and look at it. Like I say, I don't know if I'll make one for a layout. I find spiking quite tedious and the filing of the rails hard work. Even with a Dremel to help things along. People with a proper workshop would be able to mill the correct profiles for the blades and vee in an instant.
Don't get me wrong, I feel great about the achievement. Perhaps I'll change my mind at some point. 


*Fy Merlen Bach*

Winter is coming…The phrase that spawned hundreds of cringeworthy internet memes. To me it means that any model making I do will be confined...