Showing posts with label scenery. Show all posts

Monday, August 28, 2023

Riveting work

Just a short report today. As I’m packing and getting ready for our vacation in the U.K. starting on Sunday. I just booked a couple of tickets for return trips on the Ffestiniog and Tal-y-lyn railways for our days in North Wales. 
One detail that I’d decided to incorporate on the skip loading chute was rivets on the girders. Sixteen millimeter scale is large enough to warrant this level of detail. I had no idea what to use for the rivet heads, but a quick ask around some forums and tiny rhinestone jewels used for decorating fingernails was suggested. I bought a pack from Amazon. 7,200 of various sizes between 1 and 3mm for $8.99 should keep me going for a while.
I figured the easiest way to apply them is a dab of glue on the surface and then put them in police with tweezers. That was pretty much right. I also found that a scalpel to adjust the jewel to its correct spot was a good idea. After 30 minutes dabbing and adjusting I had one side of the loader started.
Can you see them? 
It’s certainly a fiddly job. But right now not too tedious. I certainly have plenty more to add. But it’s a good start. I also don’t doubt that someone, somewhere will tell me the correct pattern of rivet heads. But I don’t care. It creates a good effect, and that will do for me.

Wednesday, August 16, 2023

Planting time. Day 25-ish

After two or three days of making various types of weeds, the time has come to plant them. As a result I also decided that it was time to commit and wrap the layout in its case. It might come apart to be painted but this is it. The layout is in its home. Besides, there will be no way to design, assemble and fit the fiddle yard until the case is done. So it was done. 
Layout enclosed, pelmet in place.
Eagle-eyed viewers will notice a premises sign being tested.
With that sorted out. I got all of my 44 weeds, some white glue and a broggler, (a pointed implement for poking holes in things) to plant them in the ground, and set to work. 
I had no idea if 44 would be enough, so I just poked and planted away. In the end I used 42. (Waits for someone to make a Hitchhikers Guide to the Galaxy reference)…
I saved a couple of larger ones for later, just in case someone at a show wanted to know how they were made. I could make up a little “how I did it” display plinth.
Goldenrod and Yarrow in the scrub
Yarrow around the siding end
Cow Parsley grows around the fence
Perhaps still more are needed. But I want to add some more long grass, and I really would like to try to make some nettles. So there will be more undergrowth around and about yet. But when the overgrown track looks like this, things are certainly looking right.
Typical industrial permanent way.
The next project really must be to get the fiddle yard/sector plate fitted. I’ll save that for next week. 

Tuesday, August 15, 2023

The next big step.


We all progress in this hobby. As we spend more time working on our layouts, we develop. We learn skills.  We become better at them, Then we learn new skills. Things that we thought impossible become easy. The bar becomes raised. Sometimes without even noticing it.
Then one day you do notice it. All the little steps amount to one big step. You’re left wondering how did I get here? 
It was only a few years ago that I learned how to make my own panel track seen in this image. That too was a big step preceded by lots of little steps.
In this image there are many of the little steps since then, that lead to this next big step. 
A 16mm scale Peter Binnie skip. This is a new scale to me. I actually don’t make many kits, and those I have started usually end up unfinished. I have half a dozen Slaters O scale wagon kits in such a state. This is a simple kit, little more than 10 parts so it got finished.
It’s battered and rusty. I don’t weather. I don’t trust myself. I don’t want to ruin really nice trains with some hamfisted dirty streaks. I buy R-T-R trains with weathering on them. The rim of the skip is banged up. As I don’t weather, I never thought about this before. This simple trick was suggested to me by another 16mm scale modeller. It’s a simple fix but it makes the wagon look like it’s been in service a while.
Static Grass. I have never used static grass until recently. While you were all covering your layouts with grass fibers from expensive, or even home built applicators. I was still in the last century using scatter materials. I had convinced myself that these fibers of grass were round whereas a blade of grass had width so the two couldn’t look the same. To a certain extent I still subscribe to that point of view. But the way those long fibers grow around the timber baulk buffer stop looks very pleasing.  
The timber baulk is distressed, something else I hadn’t thought about until recently all you have to do is drag a razor saw blade down it. That’s not hard.
Weeds. The weeds are the last step. I have no idea why I thought modelling individual plants was something I could do. After all, I had seen Roy C Link’s nettles in his Crowsnest Tramway book, and thought to myself. Never.
It just seemed at that moment something I wanted/needed to try. I remembered that I had made many tiny trees for my Hitsu and Gonou T scale layouts. It couldn’t be any more difficult than that. I made about half a dozen, Then another dozen, followed by 20 more. Now I have about 40 weeds, a mix of Goldenrod, Ragwort and Cow Parsley to plant. It’s probably not enough. They are individually identifiable plants. A new skill has been learnt. A new step taken. Strangely, I find myself wanting to model nettles now.
I started to plant a few weeds on the layout. Ragwort at the sand pit end because they like sand. I pushed the skip up against the timber baulk. Just to see what it looked like.
That’s how I got here.
Looking at the scene, and the image, made me pause. I was gobsmacked. Without realizing it I had just raised my bar. All those small steps and decisions have pulled together to create a whole. The scene has a sense of place, an atmosphere. To a certain extent I feel like I’m there. To be honest, I want to go over there and tip that rusty old skip bucket over. 
So I did.
 
So here I am. In a new place. A new realization that I can do whatever I put my mind to. I’m still a long way off the abilities of the true artists of the model railway world. But in my own way I think I’m with them. In spirit at least.


Sunday, August 13, 2023

Weeding - Day 22

Making them, not removing them that is. 
One of the great things about modelling in a large scale such as 16mm is that you can do much more than suggest plants you can actually model them, and depending on how skilled you are. With quite some accuracy. I wasn’t too bothered about recreating nettles in painstaking detail like Roy C.Link did on his Crowsnest Tramway layout. But I was keen to try to go a bit further than using commercial products. I wanted to make some of my own. 
Driving around with all the summer flowers, (and weeds) in bloom. It was clear that yellow would be THE colour to use. But how to make the plants?
The secret to the method lies in tree modelling in smaller scales. There are skilled folks out there who use stranded wire twisted and bent to all sorts of shapes to recreate stunningly accurate models of trees. This may go back to G. Iliffe Stokes in August 1958 Railway Modeller. But a much simpler method will suffice for plants like Cow Parsley and Ragwort for example.
Ragwort
Cow Parsley
One thing that is apparent about all these plants in the field is how straying the stalks are. It seemed quite natural to use straight wire to model straight stalks. Keeping the stalks straight during construction was nigh on impossible.
The wire 15 AWG multi stranded hobby wire
The wire was cut to a suitable length and cladding stripped off.  The individual strands of wire were then thinned down into smaller groups of between 4 to 8 strands. These were then twisted together to create the desired shapes, and a little solder was melted into the end of the stem. This I hope will make it easier to plant the stems into the baseboard,
Strands ready to be twisted together.
Twisted strands ready to receive solder
I was feeling pretty good about the way things were going. Nothing had been too difficult. Twisting the wire strands had been fiddly, then I remembered that I had made a bunch of  trees for my T scale layout Gonou, culminating in flowering cherry trees. Happy with the way the stalks were looking it was time to foliate them.
Step 1. A spray of a green paint to get rid of the copper wire colour
Step.2 A spray with Woodland Scenics scenic cement, and a sprinkle with fine foam

Final step. Dab the ends of the stalks with white glue and sprinkle yellow (for Ragwort) and white (for Wild Parsley) scatter on the ends.
I’ve only made a dozen so far. I just made a few to see how it went. To see if I enjoyed it enough to do a load more. I don’t know how many I’ll need. But these look the part, and when grouped together will probably look quite convincing.
Another new skill learnt.


Wednesday, August 9, 2023

Day 21. All in all it’s just another brick in the wall

Those were the words running though my head as I was putting together the sand bin for the layout. You can see why… I marked out the courses to help me see them as I scribed the board. There’s no doubt about it. It’s a Pink Floyd Wall. 
So they weren’t bricks in the wall they were breeze blocks
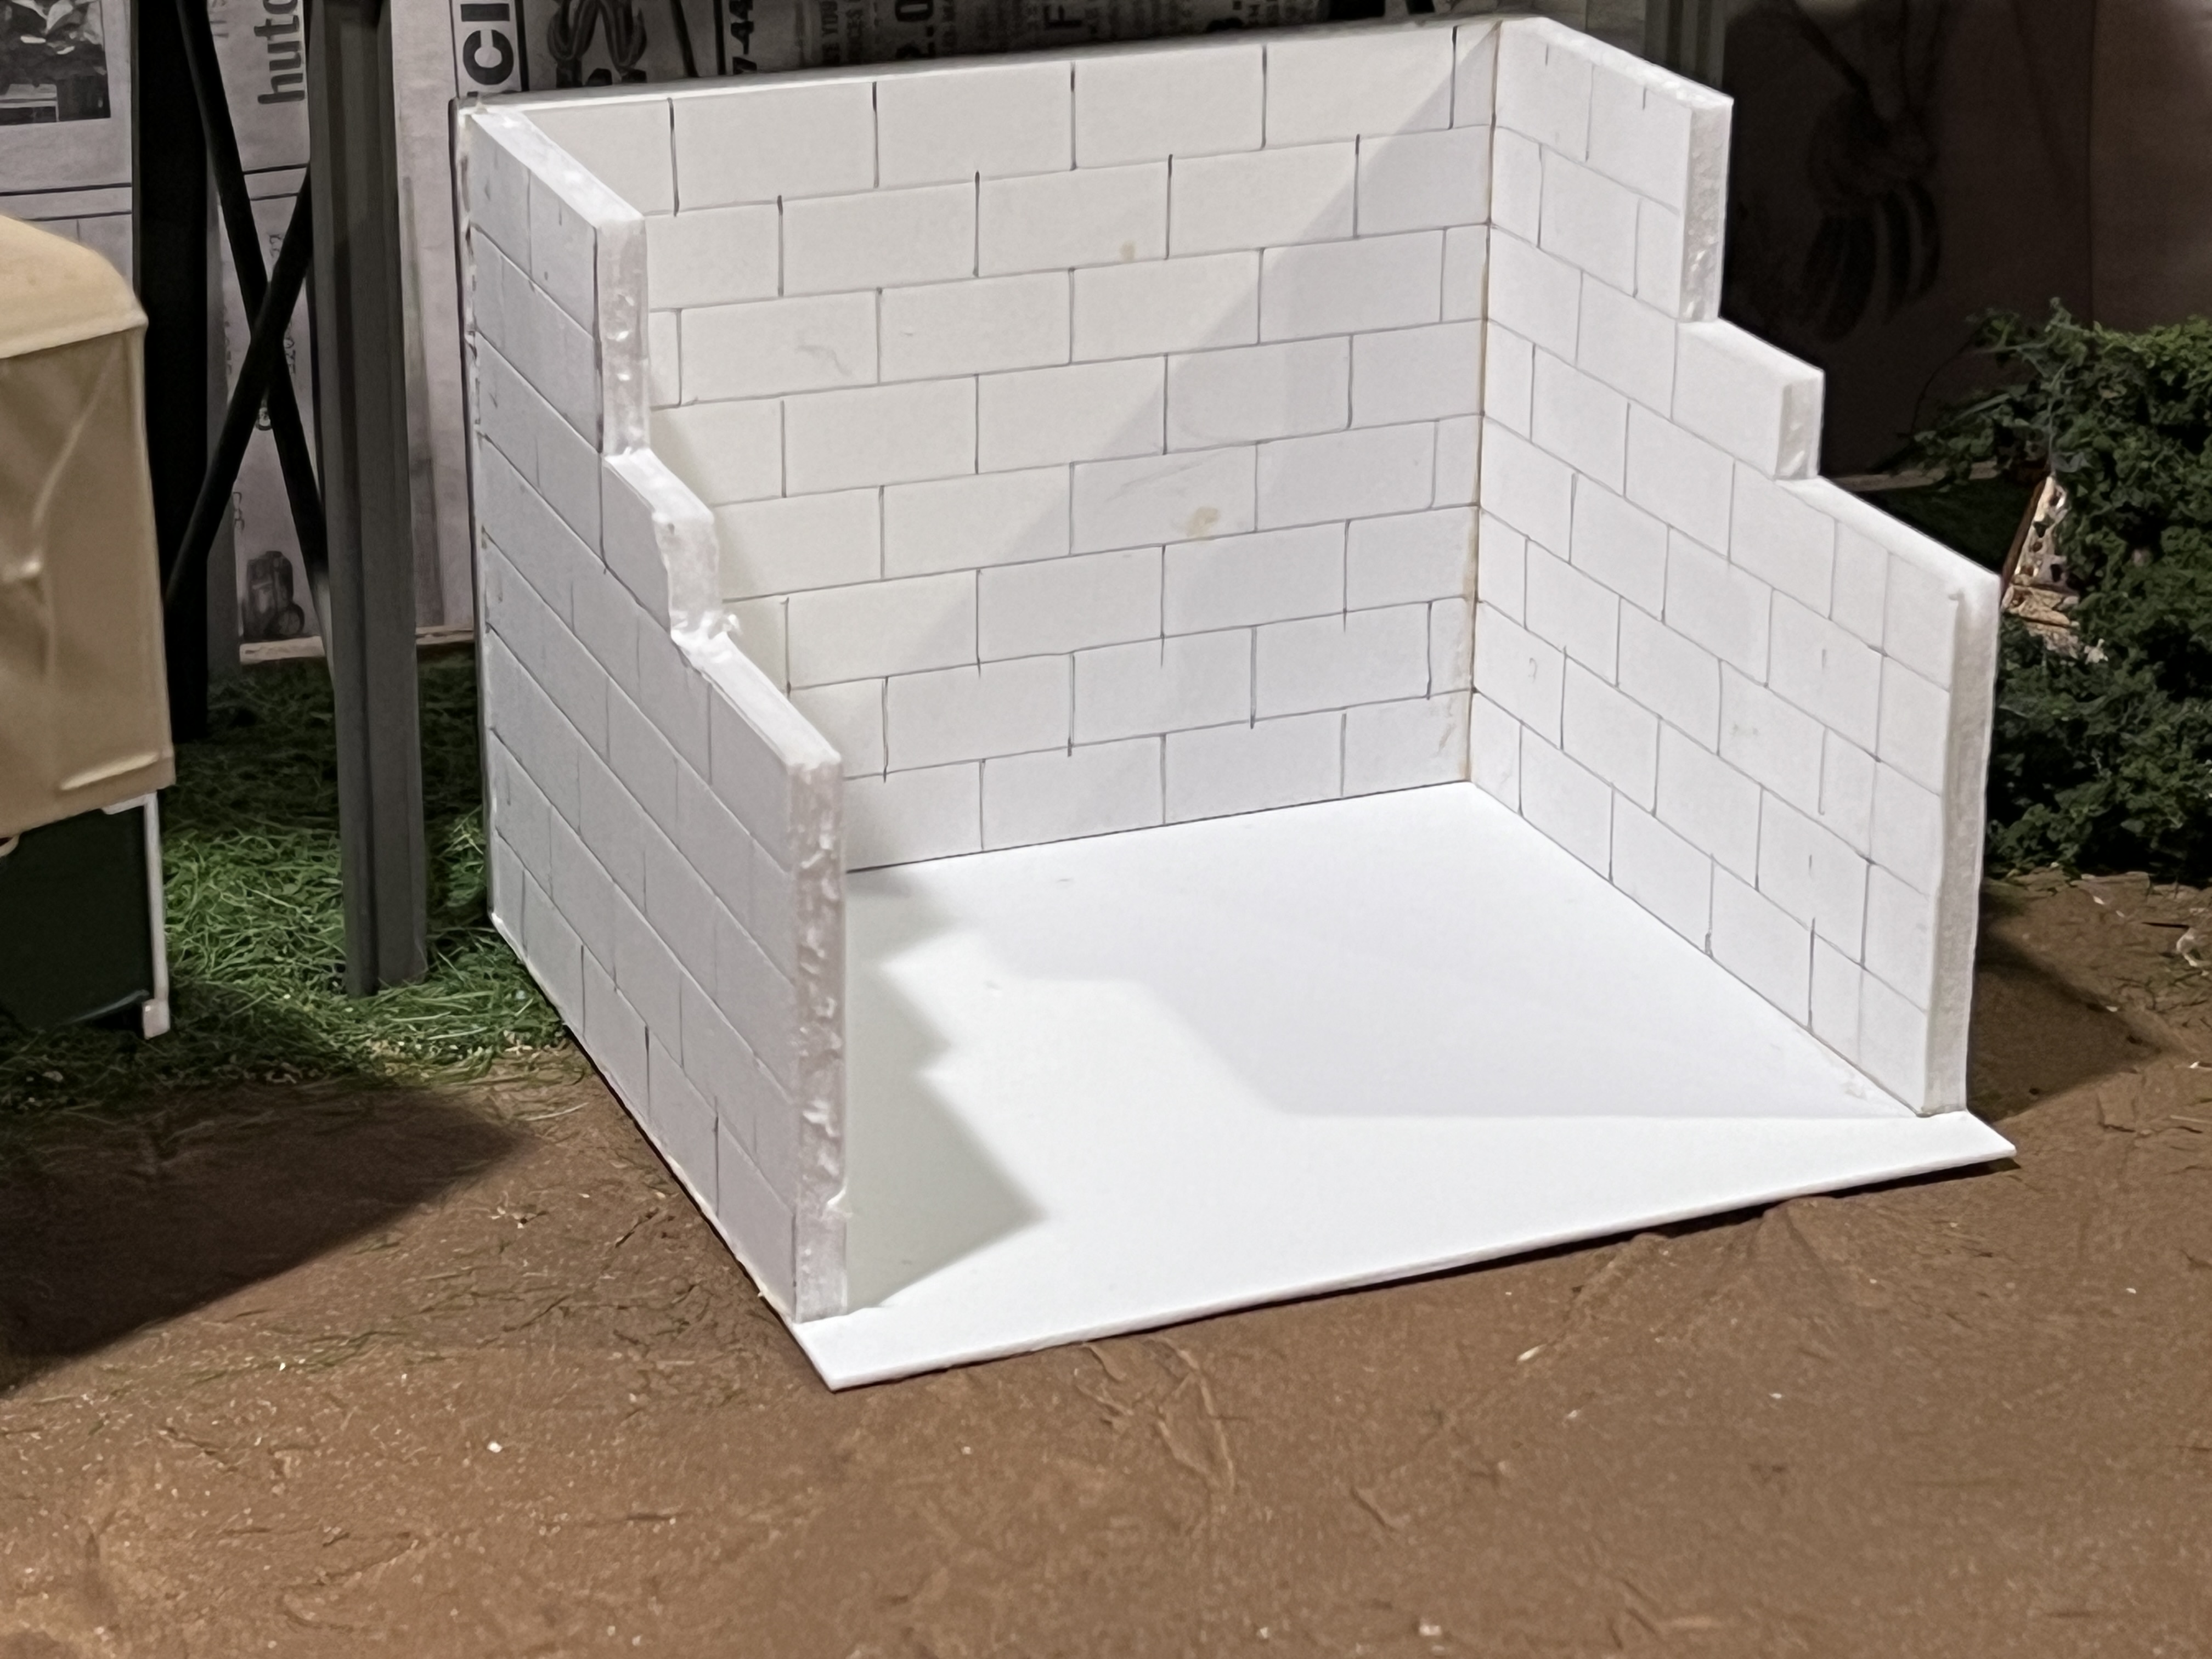
I have been thinking about the sand bin for a long time. What’s the best way to model it? This is 16mm scale. The breeze blocks (cinder blocks) such a bin would be made from have size. Approximately 22mm x 11mm x 11mm in 16mm scale. So there’s no cutting corners really. 
This is my first attempt at recreating the bin. Using foamcore board. This board is too thin to represent the older thicker concrete breeze blocks. But it’s the correct thickness for the more modern, lighter, cinder blocks. So it might work. This is going to be something that will be moved on and off the layout as it gets filled. So it also needs to be quite sturdy and to take the weight of the Woodland scenics ballast that I will be tipping. Some testing of how much handling the bin will take is needed.

There’s one other thing that the structure looks like in its current state. A urinal at a lower league English Football ground…

Monday, August 7, 2023

Day 19. Dodged a bullet

I had an enforced long break for the layout over the past four days. I had the not most pleasant prep for a routine surgery. Most I think will know what I’m talking about. It basically entails overdosing on laxatives… 
Anyway, today it was back to business as usual. The plan being to add long static grass to the layout. So I stripped everything off it and set to work.
You always think that when you have put things out of the way. That you’ve put them WELL out of the way. Nowhere near where you’ll be when working on your task. 
Then you go over to where you’d left something. The tipping dock for example, and forget that it’s there.

And…

Well let’s just say I was not a happy camper as I heard it hit the floor. The air was not blue, just silent as a wave of shock and disbelief that this had happened, rushed over me.
I dared not look though, lest I burst into tears thinking about all the work I had put into this centerpiece structure.

But I would have to look sometime…
Oh.
That’s not too bad.
I had expected to see it smashed into smithereens. Hand rails and legs all reduced to their consistent parts. 
It wasn’t. 
I don’t know if it was due to my constructional techniques or what. But the damage was manageable. None of the legs were reduced to their component parts, and only four handrails had become detached from the posts. Some of them still had the locating pins in place. Enabling me to easily fix everything back together. I lost one post. But I had several spares on hand.
Fixing the damage
I shall take my time fixing it. But it could have been so much worse.
As for the static grass. That’s not looking too bad either.
This is starting to look like neglected, industrial permanent way
Only my second attempt at static grass but looking promising
We live to work another day.


Wednesday, August 2, 2023

Day 18 This is where we’re at.

Buoyed up with confidence over the mocked up look of the top end from yesterday, (and finding more fine leaf foliage) I set to and worked on finalizing the scenery for the loader end of the layout. Things are coming along quite nicely. So I decided to put everything together so to speak, and see how it looks as a whole…
Looking good, but a bit clean around the loading chute.Much detritus needed.
Nice visual. Train passes between gaps in foreground objects
This is well on the way to looking like sand quarry trackage
Even a simple bit of detritus like a wrecked skip chassis adds to the scene
Wether it’s a hut or a sheeted down pile of whatever. This space needs something.
The tipper and bin is already well established. I just need to decide how to model the concrete blocks
Overall view from one end
Overall view from the other
I think that we can agree, everything is coming together pretty well. As the layout stands it’s pretty workable. All it really needs is the details and detritus that an industrial scene would have to pull it all together. 
Then it needs the display case with lighting. 
Then it needs the sector plate, fiddle yard/fiddle stick. 
Then it needs legs. 
Then it needs an extension. 

Wait. I didn’t really say that did I?

Tuesday, August 1, 2023

Day 17. Greenery vignettes.

You may recall that the last couple of posts on here, certainly yesterday’s, had centered around rusty corrugated iron fences as a backdrop. Reaction on NGRMOnline, the principal place of objective discussion on this project, was initially quite positive. Which I was quite happy about as I quite liked the idea. Then there was a swing away from that towards natural vegetation as a backdrop. Cool I like that idea too. I’d not had a chance to try that out. But I was definitely considering it. Certainly to help separate the scenes. Like this first picture.
Undergrowth
Don’t you like that? I most definitely do. Studying pictures of the Sand Quarry railways of Leighton Buzzard reveals an awful lot of weeds and suchlike growing all over the place. There’s no proper soil so thistles, nettles and suchlike thrive. Like in this picture on Flickr. 
Another view. The back edge of the layout has vegetation along it.
I’ve never been 100% sure how to work with that fine leaf foliage that I’m using here for the undergrowth. The “plants” always seem to want to fall apart on me. Anyway, I like the feel in this view. Static grass needs to be added to encroach on the track a bit more. But it’s a good start.
Sadly, I appear to have run out of the fine leaf foliage that I used for the undergrowth.
Yes, I’m out of fine leaf foliage. But if the hedge line gets carried along the top of the mound at the back, it should be good. How about a wrecked skip chassis as a bit of foreground details?
This picture tells a story
I just threw this scene together for giggles. One day a skip fell off the tipping dock and never got moved. 
Still more to think about…
 

Monday, July 31, 2023

Day 16 Fencing

This is really only a half a day, as I’ve been spending time putting together the Autumn issue of the Micro Model Railway Dispatch. Articles for inclusion come in in fits and starts so. It’s best to put them into the magazine layout as and when they arrive.
The idea of a rusty, corrugated iron fence in the background of the skip loader has been rather well received so I spent some time mocking up that. My time could probably been spent more productively working on the case for the layout. But that’s woodworking. As most of you know I hate woodworking, so I really have to be in the mood to do that. Here’s a few mock ups of possible layouts. The general hope is that using under scale corrugated sheet fencing there will be an element of forced perspective. Especially behind the mound right at the end.
From this angle the full length fence looks good. It’s a nice looking scene.
Here the fence looks like it is the backscene, there is a feeling of perspective.
The first consideration was a fence that runs the full length of the back of the loader section of the layout. There’s a hard edged cut off to break the two scenes apart. Though I like it, I’m not 100% convinced that this the solution.

With a 2/3 length fence, it’s still a nice looking scene
A section of fence that runs two thirds of the distance looks good. I like the fact that the fence doesn’t go all the way to the end of the scene. It helps to separate the scenes. This area could be filled with scrub, undergrowth and weeds to further help fill the area and separate the scenes.

I tried the 2/3 length fence running the other way. It’s not the same

Still a ways to go… More thinking to do.


Sunday, July 30, 2023

Day 15 or so. Showing off.

As you know this will be an exhibition layout that will appear at train shows in the MidWest USA (model railway exhibitions in UK parlance). So it will need some kind of casing around it to protect it during transit and also add lighting to show it off during a show. Exhibition hall lighting is not perfect. I’ve been to some shows here in the USA where it’s downright horrendous. But the vast majority of exhibitors are content to show their layouts under the hall lighting conditions. Not me. So this is all very important when I consider the presentation. 
The easy way is to box in the whole layout and have it viewed from the front. Then as I was looking down the layout the other day I saw this view. It echoes a view I saw of a German Feldbahn clay pit tipping platform. The resemblance was eerie and momentarily stopped me in my tracks.
I love this low down viewpoint.
This is a view that you wouldn’t see if you could only see the layout from the front, head on, so to speak.
Clearly some kind of re-think of the showing of the layout is needed. The end needs to be open.

Having the end open creates a new vista of the layout. One where you can take in several feet of layout depth. That’s the experience I want to give the viewer. To be able to draw them in to the scene and forget that they are in an exhibition hall. Because when you look at the layout from here, there really is a lot of depth to take in.
Quite the depth to the scene. Not bad for 16mm scale.
This end of the layout is really resolving itself now. I’ve said a few times that I thought there should be a small hut at the base of the retaining wall. I think that my ubiquitous corrugated shed (which is actually 1:24 scale) shows that this would be a good idea. Look at the juxtaposition of surfaces and textures. The wooden retaining wall, in front of that the corrugated hut, and in front of that the breeze blocks of a sand bin. Quite the view.
Now I have to start pulling together the other scene on the layout. The skip loader, compared to the tipping dock, there’s not much there at the minute.
This area needs more
Currently, there’s only the loader in this scene. So I added my corrugated wall to the background for ideas. Let’s face it a a rusty corrugated iron wall fits into any industrial scene. Hmm… If I placed it behind the sandy mound at the back there, perhaps the fact that it is 1;24 scale might force the perspective, adding extra depth to the scene.
Some more research is needed here methinks.


Saturday, July 22, 2023

Day 9

After a little respite yesterday to review one weeks work. It’s time to move on again. I will try set out with the aim of working on an item for the layout a day. Working during the week on bite sized chunks to keep things progressing. There’s things like the fence, the handrail around the tipping deck, things like that. To that end I decided to start with the short section of fence around the end of the dock. It was simple enough to find drawings on the internet that showed the dimensions of a simple three rail fence. 
First up I needed a couple of simple jigs to get the same sized parts to fit the same way.
It might not look like much, but this simple arrangement of stripwood and foamcore board is the key to getting all the parts to fit.

This is how it holds all the parts together.

The assembled fence. Next a quick wash with alcohol/India ink.

In place and ready to be bedded in
One more simple job done.

Friday, July 21, 2023

The eighth day review.

After one week on the project, I thought it would be good to sit back and take a look at what happened in the previous seven days. This is an overall view of all 4’ x 14” of it.
Overall view
Yes. I know that at 4’ x 14” it’s over the four square feet maximum. But putting on my ‘Editor of the Micro Model Railway Dispatch” hat. I’m always happy to give larger scales line 16mm and 7/8ths some leeway. It’s still most definitely “in the spirit of a micro” as Carl would say.
Let’s take a look at the progress of the scenes.

The skip loader in a sand quarry setting. It’s difficult to to put over the effect of a full-blown sand quarry in a couple of square feet. But a few piles of sand will help. As for the “sand”. How do you model it in 16mm scale? 
I’ve no idea, but this is how I’ve started. After I’d covered the contours with spackle, I painted the surface a cream colour, just in case whatever I chose to represent the sand came off exposing the base contours.
The first ground cover was Woodland Scenics “yellow” turf, that looks more like a green. This was sprinkled on a smothering of white glue. Then I ballasted the track with Woodland Scenics buff fine ballast. It’s starting to look OK but some more sand is needed. It feels like Steve Bennett’s early layouts.

The other end of the layout has a totally different feel to it. More conventional in its scenic treatment. There’s going to be a lot of scrub and weeds and such underneath the tipping dock. Right now the two scenes are separated by a retaining wall. It might have some vegetation growing over it, it might help to blend, yet separate the two scenes. I am very inclined to add a small shed of some description leaning against it. But probably not a prefabricated concrete garage.
At the end here, a fence and gate is planned, perhaps with a premises sign. 
The previous two pictures also show the problem with vehicles in this scale. The Land Rover is a small vehicle and yet it’s eight inches (200mm) long. I wouldn’t want a vehicle much longer than this in there. I did find a 1:20 scale toy garbage truck that could probably could have been worked into a lorry. But it was 15” long, as the layout is 14” deep so fitting it in would be rather difficult, if not impossible.
So that’s it then. One weeks work. Still lots to do, but lots to keep me interested.
Oh, one last thing. How did I get the incredibly flimsy tipper shelter to stand up? This rear view should clear things up.
How to stand the shelter up. Extra long legs hidden behind everything


*Fy Merlen Bach*

Winter is coming…The phrase that spawned hundreds of cringeworthy internet memes. To me it means that any model making I do will be confined...