Showing posts with label LocoRemote. Show all posts

Monday, November 20, 2023

*Fy Merlen Bach*

Winter is coming…The phrase that spawned hundreds of cringeworthy internet memes. To me it means that any model making I do will be confined to the basement of our little house. There will be no baseboards built, and no models spray painted. Because it will be too cold to work in the garage. There will be days when it will even be too cold to walk down to the garage, let alone work in it. 
So, like a student cramming for an exam. I need to get some things ready for working on in the dark days of winter. First up, is “Merlod Bach” or Little Pony. My version of the LocoRemote “Tiny” that I was inspired to buy whilst reviewing the real thing at the National Railway Museum in York, whilst on vacation in the UK.
I decided to go with a new name. A Welsh name. Principally because I had been inspired by the foundry at the National Slate Museum in Llanberis, and wanted to keep the Welsh theme going. The Ffestiniog Railway has Welsh Pony, and I thought Little Pony was an appropriate name given the diminutive size of the real thing.
With the temperature being a balmy 55 degrees on Sunday I gave the main body parts of “Merlod” a coat of primer.
And so it begins
Tiny comes 3D printed in Black, and I am certain that I don’t want a Black locomotive. If steam locomotives aren’t Black, then they’re Green. 
As you know, I’m in America, so the chances of buying a can of GWR Brunswick Green are next to impossible. Even more vexing was the fact that my local hobby shop only had Tamiya Green paints. Dark Green seemed the simplest colour to go for. So the boiler and water tank were sprayed Dark Green, the other parts Black. Then it started to rain, curtailing my painting activities for the day.
Colours.
Only the major parts were sprayed as I’ll test fit the other parts before I decide when, how, and what colours to paint them.
But with the main body parts sprayed I couldn’t resist the temptation, and I just had to test fit them to see how “Merlod Bach” was going to look in Green.
I think it’s going to look quite good. Don’t you?


*My Little Pony*


Thursday, July 20, 2023

Day 7

Day seven. Technically that’s one week since the project started. From the outset, I doubted that I could build a 16mm scale layout in the time frame. I’ve come on a long way though. It’s definitely starting to look like a micro layout. How does the old adage go? The last 20% of a layout’s construction takes 80% of the time? I’m getting perilously close to starting on the last 20%.
One thing that has been causing much head scratching has been the shelter for the tipping point. In the photograph I have, the structure looks flimsy. Very flimsy. It looks like it would get blown away in a strong wind. I’ve since had it confirmed to me that these structures were not to the strongest construction. The problem was to be recreating that flimsiness while building a structure that will withstand trips to model railway shows. 
With only one photo to work from and no dimensions. A lot of guesstimation was involved. I had a feeling that to keep things simple, the shelter height was the same as a sheet of corrugated metal (why waste time cutting things?). The standard sheet height was eight feet. The internet also told me that a sheet was about 28” wide. Knowing that there would also be a one and a half corrugations overlap between sheets helped calculate the length. I had some corrugated sheet that looked right and cut it to size. After that, I searched through my stock of styrene girders and found stuff that, once again, looked the right size. There was even more guesswork attached to the roof. But no-one will know. Besides, I probably used the same frame of mind in the construction of my model as the man who built the original.
My take on the tipping shelter. It looks good enough for me.
As for looking flimsy, but being sturdy. I’ve accidentally dropped it a couple of times and it has survived each fall. Job done then.
One job I hadn’t done yet was to bed in the tipping dock. I’m surprised I hadn’t done it as soon as the rails were laid on it. Because that meant I could run a train on there. There’s still lots of work to do on the tipping dock, finishing off the shelter of course, hand rails around the edge and a buffer stop at the end for starters.
But that shouldn’t stop me fitting it in place and trying things out…

You know you wanted to see a run of the train on the layout… 
The Motor Rail uses Chris Rennie’s LocoRemote WiFi system. Right now I’m perfectly happy with it. The big thing is there’s no wires to the track and the rails can be as dirty as you like. The trains will still run.
I suppose that you could say that with trains running and some scenery in place, I have built a layout in seven days…


Sunday, April 23, 2023

LocoRemote Motor Rail 12HP

 It’s been a while since I last updated this blog, so please excuse a couple of rapid entries as I get you back up to speed on the project.

First up, the LocoRemote Motor Rail kit. 

As you well know, my enthusiasm for Chris Rennie’s kits knows no bounds. They have introduced me to a whole new world of railway modelling I didn’t know existed. If you would have told me before the Covid epidemic that I would be modelling in 16mm scale. I would have laughed at you and asked where I was getting the money from to run live steam in the garden. But Chris’s products have shown me otherwise. I’ve said previously that working on 16mm scale micro layouts fills me with the same kind of excitement that I got from the early days of Gn15, all those years ago. It’s all down to these kits that give me little locomotives full of character, for about $100. 

A loco with a working headlight that sits on your hand in 16mm scale.

The unique boxy lines of the prototype are well captured.
The kit is as simple as the Huddy and Brush Amberley loco’s that I have. So there’s little else to say about the construction, other than they go together perfectly. I decided not to add any little bits and pieces to it in the way of detailing like I did with the Huddy. There’s barely any fettling to do to get the parts to fit together. The LocoRemote control unit and battery fit snugly in the engine compartment and the on/off switch is invisible, mounted so that the switch is under the chassis. In fact the only problem I have is my impatience with the glue setting. Revell Contacta professional is recommended, and it’s a fine glue, that when set makes good strong bond. It just takes a long time to get there. Too long, when I want to be getting on with things. Some of the superglues I’ve used previously also take a long time to set for me. So I must just be too impatient for the material to be bonded together.

The loco now sits awaiting primer and paint. Winter has been especially long this year in Minnesota. I’m not complaining as it has given me more time to cross country ski. But it’s also stopped me going down to the garage to spray paint all the projects I’ve accumulated over the past months. As I write this the snow has gone. But things are not warming up much. So painting is still a few weeks away.

Wednesday, January 18, 2023

A new addition to the roster.

Say “Hello” to Amberley
After all last weeks activity, I decided to take a brief step back from the layout. Things have been going pretty well, but I need to think about a few details and consider what the best way to do them is. So I decided to build one of the LocoRemote kits I had in stock. It’s the Brush battery electric number 16303 from 1917 loco that ran at His Majesties Explosives Factory at Queensferry in North Wales. 

All the Brush b/e locomotives in preservation are rather unique/ugly in appearance (depending on your opinion) and when Chris Rennie at LocoRemote announced his intention to release a 3D printed kit of the models in preservation I couldn’t decide which one to buy. In the end I went to for the Amberley one. It’s called Amberley because that’s where it’s preserved. I like the curved battery compartment covers over the more angular ones of the version from Manod. 

I shan’t give you a blow-by-blow account of how I built it. Just to say that it is to the same high standards as Chris’ other kits. Everything fits perfectly together, and there’s only a few parts that need to be glued. The battery and control unit are under one of the battery compartment lids and weights under the other. Both are hinged to open, you will need to get at the LiPo battery to change it when it needs to be recharged. The on/off switch for the power unit is in the side of the compartment but is very unobtrusive.

The cab is rather cramped, and as a consequence, the figures that will fit in there are limited. Clavey Models in the UK make a couple but as the shipping for a single driver is over twice the cost of a figure, I won’t be in a hurry to get one. Perhaps wait until I need a few and get a bulk shipping rate. Besides, the loco needs painting, and it’s going to be a couple of months before the temperatures here in Minnesota warm up enough to go down to the garage and spray paint things.

Anyway, there you go. A great little model. One that makes me glad to be working in 16mm.

Amberley hogs the spotlight, Huddy lurks in the background

Amberley looks tall but still just fits under the door

Overall, a pleasing addition to the fleet.


Saturday, September 10, 2022

LocoRemote “Huddy” part 2

Proceeding quietly in the background as I design the layout. Is the making of “Huddy”. The initial assembly was wonderful. All the parts fitted together perfectly, which really impressed me.

It sat for a few weeks while I decided what colour to paint it. Green? Blue? Red? I didn’t know. In the end I plumped for Red. Revel Italian Red to be exact. I thought this gave more of a Ransomes and Rapier feel to it.  The loco is pretty well finished now so I can share these pictures with you.

The HUDDY wording was picked out with a gold paint marker

There's little light weathering on the skip frame as well.

Picking the brake wheel out in white is a touch that I like. The black box you can see under the skip frame houses the motor

All in all, I think it looks quite passable.

I have a driver lined up for Huddy. He's from Narrow Minded Rail Works. He sits well in the cab, and looks like he could be holding onto the brake wheel or more probably resting his hand on the loco bonnet. There is even space under his feet for pedals which is a detail I'd like to get in.

The driver will be handed over to my wife for painting


The WiFi Control PCB and battery are a snug fit

The simple drive set up

The loco is powered by a small motor that sits under the skip frame. You can see the box that surrounds the motor in one of the photographs and it drives both axels by means of rubber bands, technically they are nitrile O rings, but that doesn't sound as warm and friendly. It's a snug fit as is all the control  gear and battery as you can see from the photograph. You think that it all won't fit in there but it does. And the LocoRemote control works very well indeed. Slow speed running is impressive and as there's no current to pick up from the track  it's all very smooth and faultless.
As a first 3D printed kit in 16mm scale it was a great experience. Simple to build and plenty of room to add details to suit. I have two other LocoRemote kits to build and I'm really looking forward to them.

Monday, August 8, 2022

LocoRemote Huddy construction part one.

 Covid.

The vast majority of us have succumbed to it at some time in the past two years. I had gone two years, Two vaccinations and a booster shot and not been troubled by it. I’d become complacent. I don’t know where I’d come into contact with someone. Culver’s maybe. Perhaps Starbucks. Maybe even the airport. No matter. I got it and ended up with seven days off work. I needed to do something. I have plenty of model railway projects on the go, but I wasn’t in the mood. Then it hit me. My Huddy kit.

My plan, which will become apparent as the blog goes on, is to build a 16mm scale layout for the Micro Model Railway Cartel Christmas challenge. More of that in another post, it will be a simple enlargement of the late Carl Arendt’s Sqaurefoot estate railway. The layout will need a loco and, by golly! I was in the mood to build one!

My experience with 3D printed kits is limited, but positive. The kits I have made from 6.5MinimumGauge have been excellent, and as those were tiny and these 16mm kits are huge. I felt really good about approaching the construction of one. 

The quality of the prints is outstanding. The fit of the parts is nothing short of perfect. The axle holes on the wheels needed a little work with a needle file in order to fit them and get them to gauge. But apart from that, I haven’t had to file anything to fit. It all went together so easily. Nothing dropped out of its location as I test fitted everything. In a few minutes, I had a simple locomotive that sat in the palm of my hand.

A simple locomotive body. A palette for your creativity
A very simple body. One that just screams out. “Detail me!” As I was waiting for batteries for the remote control unit to arrive, detailing was going to be done.
I don’t know much about narrow gauge industrial locomotives, So I referred to the internet for inspirational images. The version of the kit I have bore some resemblances to O&K locos and the Ransomes and Rapier at Amberley. The Rapier was my first scratch built loco in Gn15, so I have an affinity for it, so it seems quite natural that some details would end up on this model.
I reached for my stock of Evergreen Styrene sections and started to block things out.
Exhaust pipe
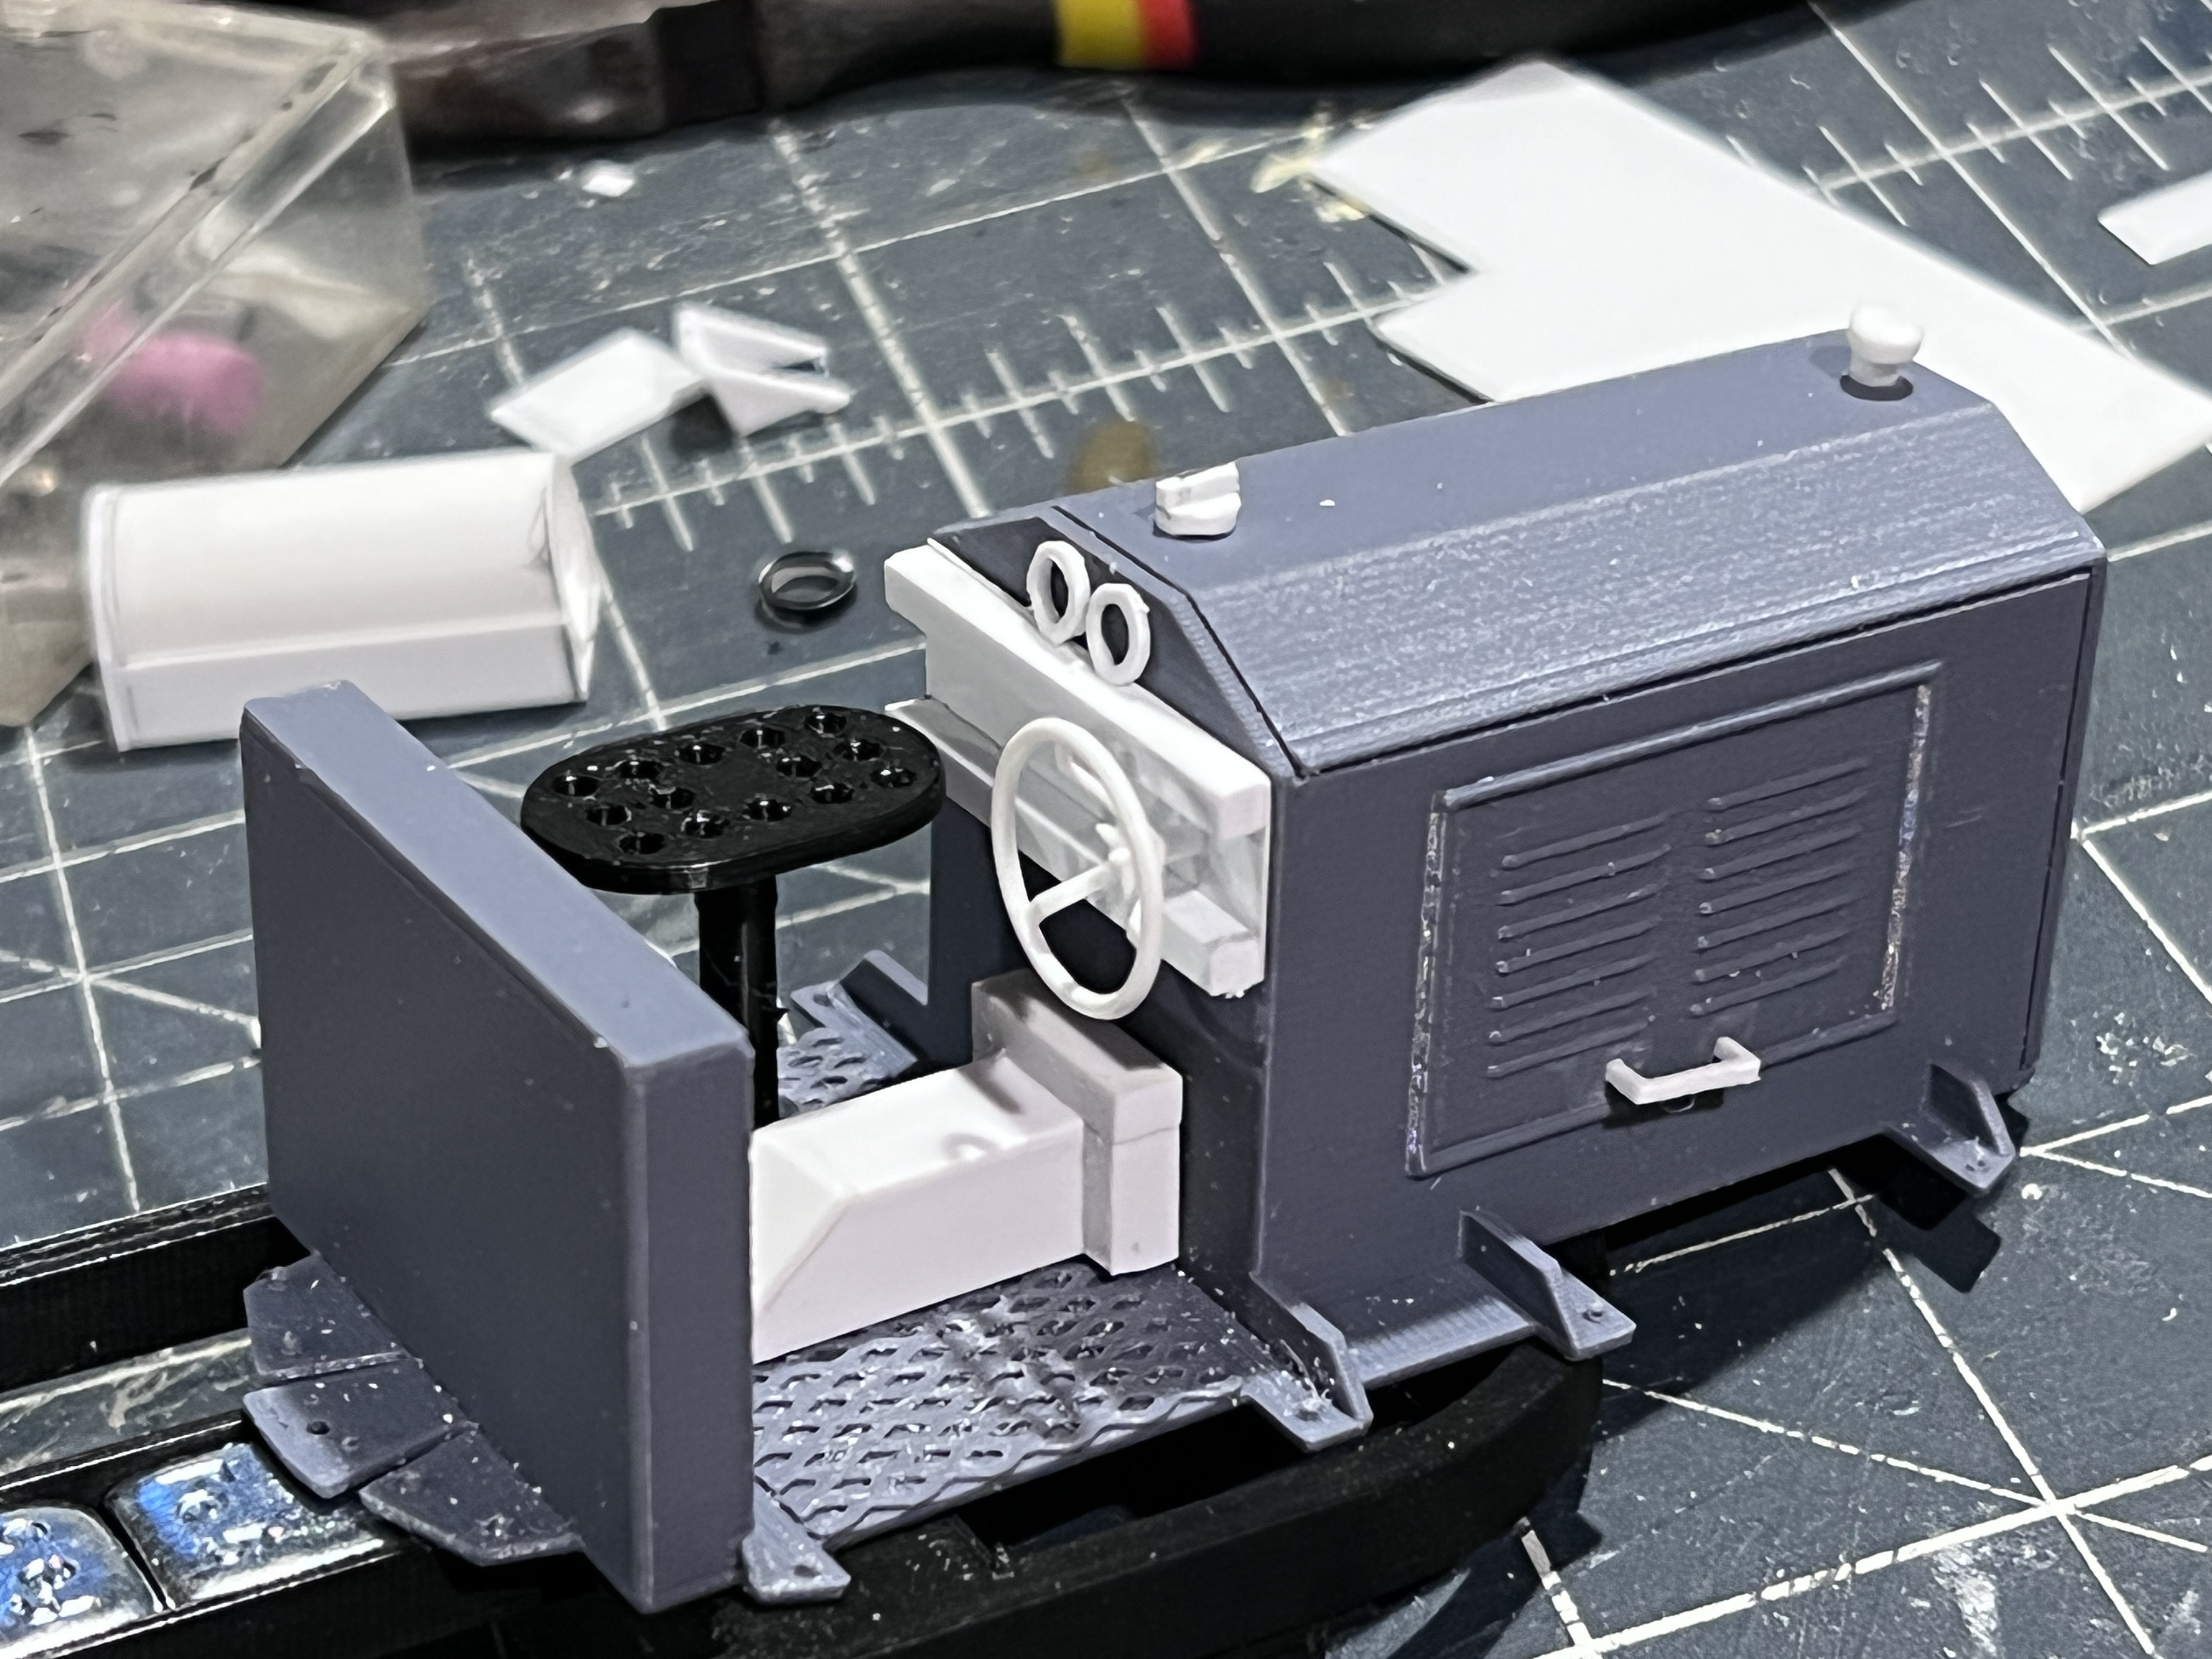
First up, was the exhaust pipe. Photographs of O&K critters seemed to indicate that a short, stubby one was in order. But what size would an exhaust pipe be? I went out to my Model T Ford and measured that one. Just under two inches. Unfortunately I didn’t have any tube of the right size so I drilled out a section of rod.

I drilled out the center of the rod carefully by hand. It went very well as you can see. I only needed the one attempt at it.

First attempt at details
Then I set to work, blocking out the other details. Radiator filler cap and fuel filler caps were a must and easily put together using sections of styrene rod. A large sized tube and angle concocted a reasonable transmission tunnel. The distinctly odd pedestal for the brake wheel was found in an image of an O&K loco. But as the only wheel I could find in my bits box was from a 1:24 scale BMW Dixi. I decided that wouldn’t work and tried to come up with something else.
Ransomes and Rapier inspired detailing
With my liking for the Rapier, I decided to try some cab details inspired by it. I was really pleased with the location of the brake wheel and the smaller transmission tunnel. The dials were a nice extra touch, though I'm not sure that the Rapier has any. The square rod used to recreate something or other in the prototype cab I was less enthused about, however. 
The final cab version
Now we are getting somewhere. The cab is now open with lots of room for whatever driver I choose to put in there. All it needed was the removal of those bars. Another detail I would like to add would be pedals and levers. But those are dictated by what kind of driver figure I have. The handle on the engine compartment was cut from some square tube but will be replaced by handles bent up from wire when the time comes.
It’s a Huddy
The final bit of detail I felt compelled to add was a nameplate/builders plate. Ever since Pam one of my early Gn15 locos when I made an Alan Keef nameplate. It’s a detail I’ve wanted to create on loco’s. Luckily I had enough letters (just) from a 30 year old sheet of Slaters 2.5mm alphabet to make up the word “Huddy”. It might be a little on the large side but the Ransomes and Rapier plate on the front of that loco is very noticeable. 
Anyway, that’s stage 1. So far assembly has been a lot of fun. The base kit is simple and easy to put together. When the batteries for the remote control unit arrived I will assemble the rest of the loco.
As I assembled everything I remembered what it was like in the early days of Gn15 and how much fun I had putting together Steve Bennett’s “Sidelines” kits. This was so like that. Those kits set me on a very productive period of railway modelling. Perhaps these LocoRemote kits can set me on the same way in 16mm scale. 


*Fy Merlen Bach*

Winter is coming…The phrase that spawned hundreds of cringeworthy internet memes. To me it means that any model making I do will be confined...