Showing posts with label design. Show all posts

Sunday, November 12, 2023

Intermission.

As you can see, a pause in the project has been reached. My unfamiliarity with the scale and the size of the items I’m planning to recreate, has caused me to sit back and think about the design and the layout. 
I know my furnace will be about the size of a Pringles tube. I know I’d really like the layout to have an area of no more than four square feet. I have an idea of what I’d like the scene to look like. But will everything work together? This then is a first sketch of what I’d like.
First thoughts
You can clearly see which holiday snap of mine influences it.
Influence
It contains the elements I’d like to see. The stone walls. The furnace. An open roof space to show the joists and timbers. A wagon turntable. For no other reason than I like them and I’ve never recreated one. Patterns, moulds and other casting accoutrements strewn all over the place. One detail that I’d really like to include to see how many notice it. Is to have a pattern and mould for the window frames. It was something that we noticed at Llanberis. Back in its heyday they must have made everything there, and I mean everything. There was even the pattern for the window frames on display, right next to a window containing the cast frame. All in all, the foundry display at Llanberis was quite remarkable, and has certainly made quite an impression on me. 
You will notice one thing missing from my sketch that is in the photo, and that’s the crane. That’s one thing I really can’t visualize the size of. So I’ve left it out for the minute. Though a crane that could pick something off a wagon and place it on the foundry floor would be a great working feature. It’s a feature I’ve recreated before on Whinny Lane in Gn15 and that went down very well at shows.
The Whinny Lane crane
The layout really needs to have the facility for a continuous run when running at a show. So that when I get distracted by the public, the train can run in circles. As long as there is activity on a layout people are happy. When I’m running a shunting layout and I am pulled into conversation, I need someone to step in to take over seamlessly so trains can run and I can talk. There have been several times lately with the 16mm scale layout, when people tried to engage me in conversation as I was pushing the skip up to the tipper, and my concentration was focused on that. It may have made me look standoffish and anti-social. Of course, nothing could be further from the truth.
A quick draft of a track plan using the geometry of Chris Rennie’s LocoRemote track pieces as a guide, shows that it might fit in an area of 3’6 x 2’. But does it “fit”?
A track plan
How much space is there in front of the mouth of the furnace? What size of mould could you fit between the furnace and the track to recreate a casting process vignette? Can I fit a crane in? Will the geometry of the track allow me to fit everything where I’ve drawn it? 
The track is drawn at the width of the track gauge, with tighter radius curves hidden off scene. As you can see, the track runs pretty close to the baseboard edges. It may well be too close. The grid squares are one inch. So you can see that the track comes within one inch of the edge. 
Clearly some track is needed so I can see if everything will fit. The LocoRemote track is available as a free download for those who have 3D printers. I don’t have a printer myself, but there is an ever-growing band of modellers who do. So I asked one of them nicely if they’d be able to print some sections of track for me and they kindly agreed. 
Their printer is working away as I type, and as soon as I receive the package of track, I will be able to see what fits where and I can move on to the next stage of the layout design.


Wednesday, November 1, 2023

In Praise of the Pringles Tube.

What is one of the most versatile things in the model railway hobby that has nothing to do with the hobby?

How overlooked is this humble item?

That’s right. The Pringles tube. The cylinder that holds those processed potato snacks has many varied uses in the hobby. Who amongst us uses them to store styrene rod and strip? I do. I have one for rod, one for strip, one for angle and one for misplaced offcuts.
Styrene storage

The cylindrical section has many uses for structures on layouts. Grain elevators in H0 scale for example. Slice them down in height and they’ll make big oil storage tanks in N. I’m sure many will have used them as the base for other things for a layout.
Now I have discovered something new for them to be the basis for. A cupola blast furnace in 7/8ths inch to the foot scale. 
That’s right. This container is a good size for the central feature for this new micro layout.
How on earth did I discover this?
I had spent a lot of time studying the photo that I took of the foundry at Llanberis looking at the detail in the furnace trying to work out the size of it. I wished I’d taken more photos. My best guess for the size was three feet in diameter, maybe a bit more. I didn’t even know anything about blast furnaces to have an idea.
Luckily, I was saved by James Waterfield and Volume 1 of his study of the railways of Sir Arthur Heywood. To start with, that’s where I learnt the name. Cupola Furnace. The furnace was discussed and the iron making process too. Sir Arthur’s furnace was described as being small. The capacity was barely enough to cast two locomotive cylinders at once. A dimension of 2’ 3” outside diameter was mentioned, and along with an annotated drawing of a furnace that was enough to get me thinking. 
A quick measure of my photo showed that this furnace was larger than that. Is it three feet? Maybe, but likely more than that. Perhaps four feet. I don’t know. Three feet six inches diameter seems a pretty reasonable compromise. That would put the charging floor (another term I learned from James’ Book) seven to eight feet off the ground. Which looked that it was about right. A three foot six diameter furnace it was then.
All this thinking made me peckish. I reached for, (you guessed it,) the Pringles. 
Hang on a moment… this is a cylinder… what size is it?
I found a ruler. 74mm. In 7/8ths inch scale, a foot is 22.225mm that makes the Pringle tube approximately three feet four inches in diameter (about one metre in new money). That’s seems pretty close to what I was thinking, and good enough to start to size things up. 
I think that’s a pretty good comparison don’t you?
This simple discovery really helped the design process to come together. The ideas as you can expect, came quickly, and a mock up was quickly put together.
The first mock up
I sat in front of this scene and stared at it for an absolute age. I got quite lost in it, getting a feel for atmosphere. Already I feel better about the size of things and the possibility of a true micro in 7/8ths inch scale. The old baseboard I used is 36” x 14” (915 x 355mm) and the short train fits in there quite well with the furnace, and I was prompted to do a quick sketch.
I think this all shows some promise. I have no track plan right now, and that’s pretty important, but the mock up definitely shows that things should fit in pretty well.
To think that this morning I had I little to no idea at all what to do. I had no feel for the size and bulk of things, until I came across a Pringles tube. 
It’s amazing how things can come together, isn’t it?


Tuesday, October 31, 2023

Scribblings and scratchings on the paper…

Planning a true micro layout in such a large scale really is the proverbial “quart into a pint pot” challenge. It would be easy to go over the four square feet limit and and produce something micro in spirit. But it is the four square feet micro layout limit that is the true challenge. Let’s see how things work out. The first thing is put together a couple of “inspiration sheets” something to draw on for ideas.
Inspiration sheet 1.

Sheet 1 has a couple of my holiday snaps from the foundry at Llanberis, which are the real inspiration for the layout. The others are Google Earth screen shots of the DeWinton Works in Caernarfon. The foundry was in the square building. There is even a plaque on the wall outside that marks its historic status. As a brick building, to me it doesn’t have the character of the stone built foundry at Llanberis.
What really grabbed me though was the arrangement of the single storey buildings along the road. Fitted tightly between the road and the riverside. I was told that these buildings were also part of the DeWinton works. But that could just have been a story told to me by a local taking my money for parking there, as we took a trip on the Welsh Highland Railway. In my minds eye, I can see an interesting layout based around these buildings with cutaway walls around the outside so you see into the buildings and watch the train pass through various store rooms etc; much like a dolls house. At 7/8ths inch to the foot scale we are in dolls house modelling territory. It would be an interesting crossover between the modelling spheres.

Inspiration sheet 2
Sheet 2 shows some interesting scenes at Horwich and Crewe works. Having the railway run between buildings, inside and out appeals to me. This would be an avenue I’d like to explore. The tiny wagons in the images makes me wonder if the wagons I have aren’t too big. Smaller wagons would have a positive effect on my T.L.U. Making them shorter.  

Toying with the idea of Chris Mears overlap concept. Indoor foundry and outdoor scene.
Now I just start scribbling, putting bits together. It’s so very difficult with no idea of sizes of things. It’s almost like I need to build the loco and wagons and some structures to get a feel for things. Making little tools is fun. But it doesn’t contribute much to knowing the size of the layout. 
Do I run the track around a corner?
I think I have an idea of what I want to do. It’s just getting the elements into a coherent whole now.

Sunday, October 29, 2023

Sprouting ideas

That was a lot of information to process in that stream of consciousness that holds the key to this next layout. So let’s break it down.
A minimum gauge railway. So we are talking 7/8ths inch to the foot and 32mm gauge to represent an 18” gauge line.
The purpose of this railway is to transport materials and finished items around a smaller sized foundry. Items like signs, gear wheels, and window frames. 
The trains would be short, one or two wagons, Wagons would carry materials such as casting sand, patterns, perhaps coal and iron ore for the furnace as well.
A particular project I’m interesting in for scratch building is one of the foundry waste wagons/tippers like those built by Sir Arthur Heywood for his Duffield Banks works. One is preserved in the narrow gauge museum at Tywyn on the Talyllyn Railway. There are drawings by Mike Decker in Volume 1 of James Waterfield’s excellent study of the work of Sir Arthur. There was even a similar sort of wagon at on display at Llanberis.
Waste tipper wagon of some description at the National Slate Museum.
One absolute must for the rolling stock on the layout is that the wagons must run on curly spoke wheels, I find them very relaxing to watch as a wagon passes.
Even at rest, I find curly spoke wheels calming
With the concept solidifying, it’s time to start to take a look at what I’m getting myself into.
What have I got myself into?
Just what have I got myself into? This is an extremely sobering image. What you see here is my LocoRemote kit of “Pet”, driver Alf, and a couple of wagons that I made back when I first dabbled in 7/8ths. They’re all big. Alf himself is about 6” (150mm) tall. My standard T.L.U. (Train length unit) that I plan my layouts around will be 18” inches (450mm). I like trains to be able to travel several times their own length on a layout, three times is the minimum, four is better. At three TLU’s the baseboard should be four feet (1220mm) long. I’m getting my first inkling of the size involved. My visions of what I can fit in a micro layout space need to be re-evaluated as I start proper planning.


Tuesday, August 1, 2023

Day 17. Greenery vignettes.

You may recall that the last couple of posts on here, certainly yesterday’s, had centered around rusty corrugated iron fences as a backdrop. Reaction on NGRMOnline, the principal place of objective discussion on this project, was initially quite positive. Which I was quite happy about as I quite liked the idea. Then there was a swing away from that towards natural vegetation as a backdrop. Cool I like that idea too. I’d not had a chance to try that out. But I was definitely considering it. Certainly to help separate the scenes. Like this first picture.
Undergrowth
Don’t you like that? I most definitely do. Studying pictures of the Sand Quarry railways of Leighton Buzzard reveals an awful lot of weeds and suchlike growing all over the place. There’s no proper soil so thistles, nettles and suchlike thrive. Like in this picture on Flickr. 
Another view. The back edge of the layout has vegetation along it.
I’ve never been 100% sure how to work with that fine leaf foliage that I’m using here for the undergrowth. The “plants” always seem to want to fall apart on me. Anyway, I like the feel in this view. Static grass needs to be added to encroach on the track a bit more. But it’s a good start.
Sadly, I appear to have run out of the fine leaf foliage that I used for the undergrowth.
Yes, I’m out of fine leaf foliage. But if the hedge line gets carried along the top of the mound at the back, it should be good. How about a wrecked skip chassis as a bit of foreground details?
This picture tells a story
I just threw this scene together for giggles. One day a skip fell off the tipping dock and never got moved. 
Still more to think about…
 

Sunday, July 30, 2023

Day 15 or so. Showing off.

As you know this will be an exhibition layout that will appear at train shows in the MidWest USA (model railway exhibitions in UK parlance). So it will need some kind of casing around it to protect it during transit and also add lighting to show it off during a show. Exhibition hall lighting is not perfect. I’ve been to some shows here in the USA where it’s downright horrendous. But the vast majority of exhibitors are content to show their layouts under the hall lighting conditions. Not me. So this is all very important when I consider the presentation. 
The easy way is to box in the whole layout and have it viewed from the front. Then as I was looking down the layout the other day I saw this view. It echoes a view I saw of a German Feldbahn clay pit tipping platform. The resemblance was eerie and momentarily stopped me in my tracks.
I love this low down viewpoint.
This is a view that you wouldn’t see if you could only see the layout from the front, head on, so to speak.
Clearly some kind of re-think of the showing of the layout is needed. The end needs to be open.

Having the end open creates a new vista of the layout. One where you can take in several feet of layout depth. That’s the experience I want to give the viewer. To be able to draw them in to the scene and forget that they are in an exhibition hall. Because when you look at the layout from here, there really is a lot of depth to take in.
Quite the depth to the scene. Not bad for 16mm scale.
This end of the layout is really resolving itself now. I’ve said a few times that I thought there should be a small hut at the base of the retaining wall. I think that my ubiquitous corrugated shed (which is actually 1:24 scale) shows that this would be a good idea. Look at the juxtaposition of surfaces and textures. The wooden retaining wall, in front of that the corrugated hut, and in front of that the breeze blocks of a sand bin. Quite the view.
Now I have to start pulling together the other scene on the layout. The skip loader, compared to the tipping dock, there’s not much there at the minute.
This area needs more
Currently, there’s only the loader in this scene. So I added my corrugated wall to the background for ideas. Let’s face it a a rusty corrugated iron wall fits into any industrial scene. Hmm… If I placed it behind the sandy mound at the back there, perhaps the fact that it is 1;24 scale might force the perspective, adding extra depth to the scene.
Some more research is needed here methinks.


Friday, July 7, 2023

The next step (part 3; mock up)


A good idea.

It is a good idea, isn’t it? Something like this really ticks a lot of boxes for me. We have the front siding, where we have a workshop where, if I’m clever. The inside should be able to be viewed without any problem. I like detailed workshops. There’s one on Give Way to Trains, and many years ago there was one on Purespring Watercress. I like tools. I’m not mechanically minded enough to use them. But tools are a great detail to fit into a workshop scene. Hopefully I can make something work in there. We need to start mocking up.
The first thing I work with when mocking up, is what I call the “Train Length Unit” or TLU. How long will a typical train length be on a micro layout?  It dictates what you can do in an area. It’s no good having a 4’ (1220mm) TLU on a 4’ long layout. It can’t move.
My TLU will be based around a short loco like the LocoRemote MotorRail and a couple of Binnie tippers. 
TLU = 11” 280mm
As you can see, the TLU is very short for such a large scale. On a 4’ long layout, the train will travel its own length four times. Which I feel is a pretty good minimum for a micro layout. With that detail ironed out, I felt I could start the mocking up.
The tipper
Let’s start with the tipper vignette. What should the height of the rails above the ground be? In the Sydney Leleux article in The Review, he states that if the material was being tipped into a standard RCH wagon that height should be  about 10 feet. Ten scale feet would be 160mm (about 7”). As I’m not planning on tipping into any vehicles (road or rail), I decided to go with what looks right. I added a couple of chaps from Give Way to Trains to the scene for scale. The rails are above them. But not too far above. In this image the rails are 120mm (just under 5") that’s about 2.3 meters or seven and a half feet in the real world. Not bad. I'm inclined to think that any taller would look too tall, especially given the narrow baseboard. This is being mocked up on a piece of white expanded polystyrene sheet 4' x 14" in size, and the layout will likely be the same size.
A workshop
Now the workshop. Its primary purpose is to to hide the exit to the sector plate/fiddle stick. It could be a fully modelled building, or it could be part relief, or even built to fit the site. Depending on the structure. Clearly there's plenty of room to fit a structure in there. The siding poking out of the building is a nice place to pose items for layout viewers and photographers. The scope for detailing around the workshop with scrap, spare parts and other detritus is enormous.
Overall view
Overall things look pretty good. I like what I see a lot. There's a lot of space. For a large scale in a small space. It's almost empty. I put my Land Rover in there to see if a truck could be fitted in to be loaded. A small one probably. But in these days of Radio controlled vehicles on model railway layouts I'm not sure there would be the room for one to operate. The trees that I sketched into the original concept will probably have to go. Or at least be smaller low relief ones, from the way I see things going together. So with a quick sketching over the mock up photo. You get this…

I think it will work.


Thursday, July 6, 2023

The next steps (part 2 inspiration sets in)

How do we get from this: That I see set in the Minnesota Northwoods in On30

To something in England in 16mm scale?
It's all about inspiration. In issue 134 of Narrow Gauge and Industrial Railway Modelling Review there was an article by Sydney A. Leleux about emptying side tipping wagons. As you may know I'm a firm believer in working features on micro layouts, and tippers fit that bill perfectly. 
There was a picture on p.278 of the loading of a lorry at George Garside's Double Arches quarry. The rail line sits on a raised, wood surfaced tipping dock, surrounded by bare trees. It must be a winter scene. A tarpaulin is draped over a fence. There’s a corrugated iron shelter around the tipping chute on the wooden loading dock. A large brick building has a small lean to shed attached to it.
Chris’s concept sprang to mind. Why it did so, I don’t know. Like I said, the idea had gone on the back burner until the time was right. The time must be right. I don’t argue with my creative mind. A wooden dock. I had imagined a wooden dock in Chris Mears scheme. There’s a wooden dock in this image. That must be it. Like I say, I don’t argue with my creative mind.
I searched out other images of Garside’s and other plants. There are so many inspirational pictures of 2’ gauge railways around Leighton Buzzard, where Garside’s was located. But nothing as inspirational as the picture in The Review. 
Ideas come thick and fast. A two level scheme… With a front low level siding in a yard and the tipping dock at the rear perhaps?.. Difficult to work between the two levels in the offstage sidings… Cassettes, or a fiddle stick or a sector plate… Keep tracks on the same level… 
I found a picture of  a “Loco Shed” at Double arches. A wonderful concrete block and asbestos roofed structure, full of character… Perhaps this could be my scenic break at the right hand side... Perhaps that might be a bit big in the confines of the micro… A smaller workshop then?.. A line runs through the workshop… There are bins at the foot of the tipper… Look at this picture… Big bins… Wait a minute… Is that different grades of sand/gravel in the bins?.. Certainly different colours of material… That could work… Tipping two different grades of materials into different bins…Make the bins removable for ease of emptying…  
I felt that it could turn my scribbling and scratchings on paper into some kind of coherent sketch.
First coherent concept sketch
Ooh. We’re getting somewhere. I love sketches like these. So free and unencumbered by niceties like track geometry, clearances and suchlike. I feel the need for some mocking up. 
But that’s a story for another post.


Wednesday, July 5, 2023

The next steps. (part 1 introducing the catalyst)

Moving on from "Give Way to Trains". 
I have for a while, been considering the best way to expand on my new found enthusiasm for 16mm scale micro layouts. 
One thing I was considering was an extension to the original Cartel Challenge layout. This was the reason I built the Y turnout. At least one turnout would have been needed on the layout extension. I didn't enjoy the project, even though I have something that I'm proud to have made. I found the removal of the sections of rail that was needed to get everything to work tiresome and hard work. It's not like working with code 75 bullhead rail in 4mm scale, where the rail is trimmed to size and shape with some strokes of a file. Working with code 148 rail involved cutting sections of rail away with a track cutting disc. I didn't enjoy it at all. That's OK we all have aspects of the hobby we don't like. If I was modelling in any other scale I could buy turnouts. But that's not possible in 16mm scale. There are no R-T-R turnouts. There are downloadable .stl files for 3D printed track, But I've already established my track construction method, and wouldn't want to change from that. While I'm not a huge fan of hand spiking track, I can tolerate it more than filing, cutting and grinding code 148 rail.
What to do then?
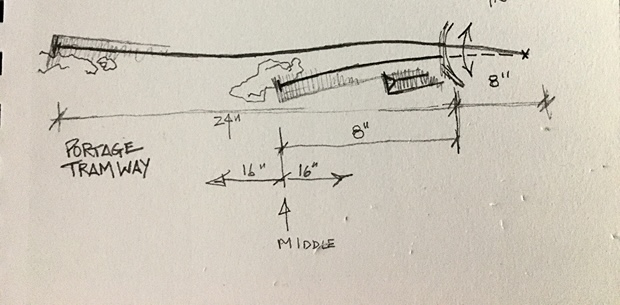
There are only two blogs on the internet that I check everyday. One is James Hilton's "Paxton Road". James updates his site daily. There is always something skilled, interesting, and/or thought provoking to read. The other one I check is Chris Mears' "Prince Street". Chris' blog is like the tide, it comes in and out. Sometimes he posts regularly. Sometimes he goes for a while without an entry. But I find that if I don't check it, then I miss something interesting. Like back in September of last year when he posted this conceptual sketch for an idea of his called "Portage Tramway".
A catalyst
It might not look like much to those of you who hanker after long freight trains rumbling across the prairies or high speed passenger trains. But if you like sleepy narrow-gauge and industrial lines. Then you might get something out of it. 
Let's start with the name "Portage Tramway". If you live in Minnesota, portage is a word you become very familiar with:
Portage is the practice of carrying water craft or cargo over land, either around an obstacle in a river, or between two bodies of water. A path where items are regularly carried between bodies of water is also called a portage. The term comes from French, where porter means "to carry," as in "portable".
There are portages all over the Boundary Waters Area Canoe Wilderness in Northern Minnesota. That's what sprung to mind as I looked at this. Somewhere to run my Bachmann On30 stock. 
A short narrow gauge railroad runs between a couple of lakes, taking freight and people about their daily lives. A vital lifeline in this vast remote area of the state. A couple of short sidings sitting on a rocky lake shore are all the railroad has here. A short one with a timber passenger shelter on it for passengers and a longer one, to a dock on the lakeshore. It certainly conjures up atmospheric images in my minds eye every time I think about it.  My Bachmann Railbus could shuttle in and out of that passenger platform all day and keep me happy, while my Porter or other small loco shuffles freight off and on the dock, maybe spotting a car in the platform road to make a switching move.
But it's one heck of a long way from a 16mm scale industrial micro layout. But conceptually, it's not a huge leap.
It's the idea presented that's important here. There are two different worlds in this scheme. The short siding and the long one. Do you want viewers to admire the effort you put into a loco or some rolling stock? Sit it on the front siding. If you want to lose yourself in the moment, set a train slowly down the rear siding. A train doesn't have to travel far, for you to loose yourself in it and forget it's only covering a few feet in the real world. All appealing ideas.  
So I did what I always do, stuck the idea on the back burner, knowing full well when the time was right it would re-emerge.
So lets take a breath before this post gets any longer and meandering like a stream to portage...


Tuesday, October 18, 2022

Land Rover as a view block? Why not!

I love a Land Rover
A week or so ago now, my 1:18 scale Landrover arrived. A grand little model. OK, little is something of a misnomer in 1:18 scale. It's close to six inches (150mm) in length. But the series 1 Landy was a small vehicle. By todays standards anyway. 
However, it does eat up a fair bit of real estate on my micro as I found out when I put it where I wanted to, while testing things out on another blocking in session. If I were to put it where planned, it would eat up the space I had in mind for the workshop scene. It would block the view of the layout too much.
Testing out a rock face and the Land Rover

I was a little disappointed. I really wanted the Landy in the layout, and the workshop too, for that matter...
Wait a minute...
Did I just say the Landy was blocking the view?
Then why don't I use it as an intentional view block?
I've been struggling with how to hide the exit to the sector plate for a long time, ever since I started the project. Walls, fences, and now rock faces, have been considered. So why not a Land Rover? I put it in place. Not quite knowing what to expect. 
This is about as natural a looking scene as you can get.

Huddy is small and is easily hidden by the Land Rover

Seriously? Now doesn't that look the part? It only protrudes into the scene by about three inches (75mm) so doesn't eat up a lot of room. Huddy really squeezes by. The fact that the Landy is parked uphill adds another dimension to my mind. 
I'm not entirely sure about the rock face, I think it obstructs the rear building and the forced perspective it creates too much. and may try a fence again. Perhaps it's the unpainted colour of the foam. a duller, dirty rock face might just do it. 
But what the heck, that's for another day.
Today it's Land Rover for the win!


Wednesday, September 14, 2022

A change of track?

The track is down, and after a few sprays of dull reds and browns. It looks like some rusty old track that's been laid in the country somewhere. 


But where? This really still isn't established yet. I've floated several ideas in the past few weeks. But we're really still no closer to getting the final subject really tied down. Peat. Shale oil. Sea Defences. No idea. Then I saw a post on Claus Neilsen’s Nystrup Gravel Blog about a Land Rover. Now I love Landy’s. The older the better. I have fond memories of riding in an old series 1 Landy with my dad as a child. A Landy on any layout of mine is a good idea. A Land Rover appears on my 00 scale “Nowhere Road Halt”. There are 1:18 scale Land Rovers out there. The temptation is strong. I even did a little quick sketch throwing a Landy in there.


I'm a little unsure of the size that a Landy would take up. A short wheelbase series 1 isn't very big, but in this scale is about 5" long. It would fit in the front corner area that I've drawn it in and it would certainly present an unusual view block. I doubt that the workshop would fit there to though. In that case it could be moved to the rear. 

But putting the Landy in there reminded me of home and my other great rail interest. The Potato Railways of Lincolnshire. I've been planning a Potato Railway scheme for the longest time. Yes. there's even a blog for it out there, untouched for two years. There were about 140 miles of railways serving potato farms in Lincolnshire. The majority of the miles were taken up by two systems. Nocton Estates, near Lincoln and Fleet Farms near Holbeach in the south of the county. But most of the lines were short, barely a couple of miles long, sometimes only a few hundred yards. Lines that ran from the middle of a field to a loading dock alongside a road. Hand worked or horse worked.  There's a fascinating book on the subject by Stewart Squires, that will tell you everything you need to know about even the shortest of lines.

The book contains many inspirational images that I have imagined schemes around. But nothing has stuck. Perhaps in this instance I’ve been trying too hard. I do sense a germ of inspiration here though. I think I need to take another look at Mr Squires book and see what I can find.

Monday, September 5, 2022

Back to the sketchbook

 I made a trip to my local hobby shop (Hub Hobby in Richfield, MN. A 40 mile trip) on Saturday to get some paints to finish off “Huddy”, more on that when it’s finished. While I was there I was rootling through the 1:18 automobile shelves. Let’s face it 1:18 scale is as near as dammit the same as 1:19.05 for 16mm scale. I was still rather keen on a suitably sized car on the layout. A Landy (Land Rover) would be nice, but not surprisingly there wasn’t one around. But what I did see was this:

Do these 1:18 scale tools hold the key to the layout?

Tools. 1:18 scale workshop tools no less. In my blockings in. I had mooted the idea of a workshop in the distance. I like the idea of a workshop scene. I had a very nice one on Purespring Watercress, 

Purespring Watercress workshop

It garnered a lot of attention. Perhaps another one would be in order. With almost scale sized tools, it would be a lot easier. Tool chests, Air compressor, Welding equipment. I looked further and I find that there’s a lot of 1:18 scale automotive workshop equipment out there. 

My mind went to the sketchbook. Now that I have blocked in photo’s that I was very happy with. I could use those as a basis for my iPad musings.

A front three-quarter vision of the layout with workshop

Only the layout operator will get to see this view of the layout
Looking at these I think a workshop scene is a really good idea, and right now I really like the idea of scratch building a 16mm scale pillar drill. It will probably be easier than making a Land Rover.
A workshop scene it is then.


Friday, September 2, 2022

More Blocking In

Wednesday nights blocking in session went really well. A lot of food for thought. This spurred me on for further explorations. 

(1) An overall view. Changes from yesterday might look minimal. But I brought in my 7/8ths inch scale garden shed (now that's a big, little, building) to stand in for the structure I've been calling the boiler house. I like the chimney up front. It helps to create that nook or cranny the viewer can look around to get drawn into the scene. That way I can keep the other structure at the back to reinforce the forced perspective effect.

(2) Down at eye level. The chimney is still nice here and I love the forced perspective in the model. There’s a “layering" of the different scales that I really like. 

(3) Moving the chimney towards the rear is what really accentuates the forced perspective. If I’m honest I think I prefer the chimney at the rear. The chute you can see was for when the building was planned for Cuddle. It tips perfectly into a Gn15 skip. Not so a 16mm scale one. Modification would be in order.

(4)  A Cardboard box stands in for some structure or other. I think a structure here with 16mm scale brickwork would really accentuate the layers of the forced perspective. 

(5) The first picture where I actually don’t like the location of the chimney. I'm feeling cramped. Perhaps something else could be used to create the nook and cranny here.  I did toy with the idea of a 1/18 scale vehicle here, like a Landrover, that was, until I saw the price of one. Don't ask...

(6) Ooh look! There’s a door. I wonder what could be in there? Little details like that ask questions of you and draw you into the layout. You might not be able to see the interior of the building, but you can still be drawn in.

(7) This is a nice view. Properly cluttered up, it could be a nice vignette.

All in all, I think I'm there. I think I have a real idea of how everything needs to come together now. I feel that I may have set myself too much work to get this layout finished for the December deadline of the Cartel challenge. But I think the end product is going to be worth it.

*Fy Merlen Bach*

Winter is coming…The phrase that spawned hundreds of cringeworthy internet memes. To me it means that any model making I do will be confined...