Showing posts with label track. Show all posts

Tuesday, July 18, 2023

Day 5.

 First thing on the cards today was the laying of the rails onto the deck of the tipping dock. Spiking rail, as you know, is not my favourite task. But as confidence was at a high after yesterdays progress, I felt pretty good about pressing home tiny nails into basswood. 

Spiking in progress
When a succession of spikes go in easily, I feel good about it. Sometimes they don’t. Then the job becomes tedious. But this is still a new technique for me. I’ve been spiking little more than a year. I’m sure I can grow to tolerate it. 
But I did feel good when I had the whole deck spiked and a wagon on it..
A skip tipping on the dock. As it should be.
In other news, there’s been a slightly major change of plan. Having waxed lyrical in praise of the prefabricated concrete garage. It’s now gone from the layout, to be replaced by a skip loading chute. 
Last night as I was about to go to sleep, an idea came to me and I needed to sketch it so I didn’t forget.
Had to scribble this before I fell asleep
As I was emptying a skip at one end of the layout, it seemed to make more sense from a story telling point of view to load wagons at the other end. 
I had been having informal discussions with Chris Mears about his scheme, and he told me how he would get more pleasure out of loading and unloading skips than anything. That remark stuck at the back of my mind a while. Laying there dormant, until I needed it. 
There’s nothing wrong with my idea of a workshop scene. I’ve done too much research on prefab concrete garages to let the idea totally drop. But it doesn’t tell a story. Wagons would just appear from offstage and be tipped. Without reason. Small layouts, and particularly Micro layouts need to tell a story to get audience engagement.
If the two scenes here can be successfully separated to represent two ends of a small industrial system. Then a story can be told. Material is loaded into a wagon at one end of the line. Material is tipped out at the other. There’s countless small systems where this happens. 
I’m liking this concept more and more as I think it over. There is the potential at a show, to invite punters to load the wagon somehow, and then see the load tipped out. For a child, you could even tip some sweets or candies into a wagon to be transported to be tipped out in front of them. Audience engagement.
I mocked up a wagon loading chute to get a feel for the idea. 
A mock-up loading chute idea.
The mock up looks pretty good. I went a bit further and mocked up a few more scenes up and took a few more shots. This time I converted them to black and white to remove the distracting scenery and colour of my kitchen. The overall effect has great promise. As with Croft Original Sherry. “One instinctively knows when something is right”
A pile of sand or some change of relief is needed to help separate the two scenes

Aerial view

Perhaps a shelter for the tipping point could be useful.
Still lots to think about. A lot of headway has been made these last couple of days. Things are feeling really good.


Saturday, July 15, 2023

Day 2.

It does seem strange typing that after all these years.
With the liquid nails setting, there was nothing I could do to the layout itself. So I decided to cut the sleepers for the deck of the tipping dock to size. I had gone out and bought some basswood strip 5/16” x 7/16” after I’d dropped my wife off at the airport inn the morning. I picked that size because that was what Roy Link used for his sleepers on his 16mm Crowsnest layout. I made myself a simple little jig for scale 6’ long sleepers and started sawing with my razor saw.
A very simple jig using a mitre box and some foamcore

Timber decking for a 17” long deck. My deck will be 24” long. Back to the hobby shop then.

24” of timber decking
Not buying enough basswood strip on Thursday, I had to go back today and get some more. I still didn’t buy enough strip but manage to piece together enough from off cuts. 
This is one of those aspects of the layout build that I think doesn’t translate time-wise from a smaller scale. Having cut all the decking to size. I had to distress and paint/stain them all.


I’m still trying to find a good mix of India ink wash and acrylic staining. Sometimes it goes on really well (bottom picture) and then it starts to fade as it soaks in (upper image). 
We will just have to see what these look like in the morning.


Friday, July 14, 2023

Back on track.

Momentum is building up on the layout project, and today I decided to lay the track on the layout. Lay the track being rather over describing the work as there is barely six feet of track to deal with. As there is one third of that on the yet to be built tipping dock. I thought that a bit of track laying was in order to create the impression that a layout is on the way.
Regular blog followers will know about my track construction method. If not check it out here. You’ll also know it’s one of my least favourite aspects of layout building. But as there’s not much to do, and it’s all in a straight line. I figured I could put up with it. In addition to that, as the tipping dock will have a timber surface, I thought it would be a good idea to try spiking to basswood. 
In a change from my previous method, I decided to try Micro Engineering medium spikes instead of the large ones previous. I had always thought they looked a bit large, and I think they may have interfered with the wheels on the rolling stock.
I definitely feel that the newer size of spike looks better and the flanges of the wheels most definitely do NOT touch the spike heads.
Where the floor of the workshop will be on the model I spiked the rail to some basswood strip. Working on the theory that If I made a real pigs ear of this process it would at least be hidden under the floor of the  building. Not enjoying the original process. I enjoyed spiking basswood even less. It’s a tough wood to spike, and it helps to pre-drill a small hole in the sleeper to start the spike as you push it home.
Anyway, after a couple of hours, I had all the “ground level” track installed. 
I’m sure most of you have thought at some time of other. “Why on earth does he persist with this track laying method when he dislikes it so much?”
Quite simply. It looks good. I like the way it looks. A lot of people like the way it looks. So I think it’s worth sticking with. I might get to enjoy it after a while. 
I'd better get on and build the layout then...


Wednesday, June 28, 2023

What’s the point. Part 3.

I couldn’t leave my proof of concept work unpainted for long. A quick spray with a Tamiya Dull Red and a light earth from a couple of rattle cans then a little ballast between the track and there you go. A quite acceptable piece of work.


Tuesday, June 27, 2023

What's the point. Part 2.

 Nice and recovered after my marathon I felt ready to finish off the turnout. The onerous task facing me was the spiking of the rails. 
Some people like spiking rail, some don't. I've not decided where I sit in the two camps. I don't particularly enjoy the task. It's something I have to be in the mood to do. But it's pretty much the only way to do what I want to get the effect I'm after. Out came my spikes and spiking tool  and away I went.
All the parts ready to go. The rail is code 148. That's a LOT of rail to cut and file away to make blades and vees. That took quite some time, and all the while I was fettling them. Filing a bit here and there to make the blades fit as I assembled the track.

I started at the vee. I really should have modelled the turnout with a crossing reinforcement plate. As it would supply some support to the vee. It could have been superglues to the plate, along with parts of the wing rails, should I make another. 

The blades, a lot of filing to be done on these to get them to fit. A tie bar system will have to be devised.

Done. For now. It needs a reliable pivot system for the blades and a tie bar. There's no doubt that it looks the part. But all the filing and spiking. It's just something I need to be in the mood for.

A vee skip chassis will navigate the turnout carefully

A last look at the project.
There we are then. I'll probably call this one good and give it a rusty paint job, like I did my original section of track, and put it on a shelf and look at it. Like I say, I don't know if I'll make one for a layout. I find spiking quite tedious and the filing of the rails hard work. Even with a Dremel to help things along. People with a proper workshop would be able to mill the correct profiles for the blades and vee in an instant.
Don't get me wrong, I feel great about the achievement. Perhaps I'll change my mind at some point. 


What’s the point part 1

Over the past month or so, I have been working on something pretty important as I think about extending the original micro layout. 
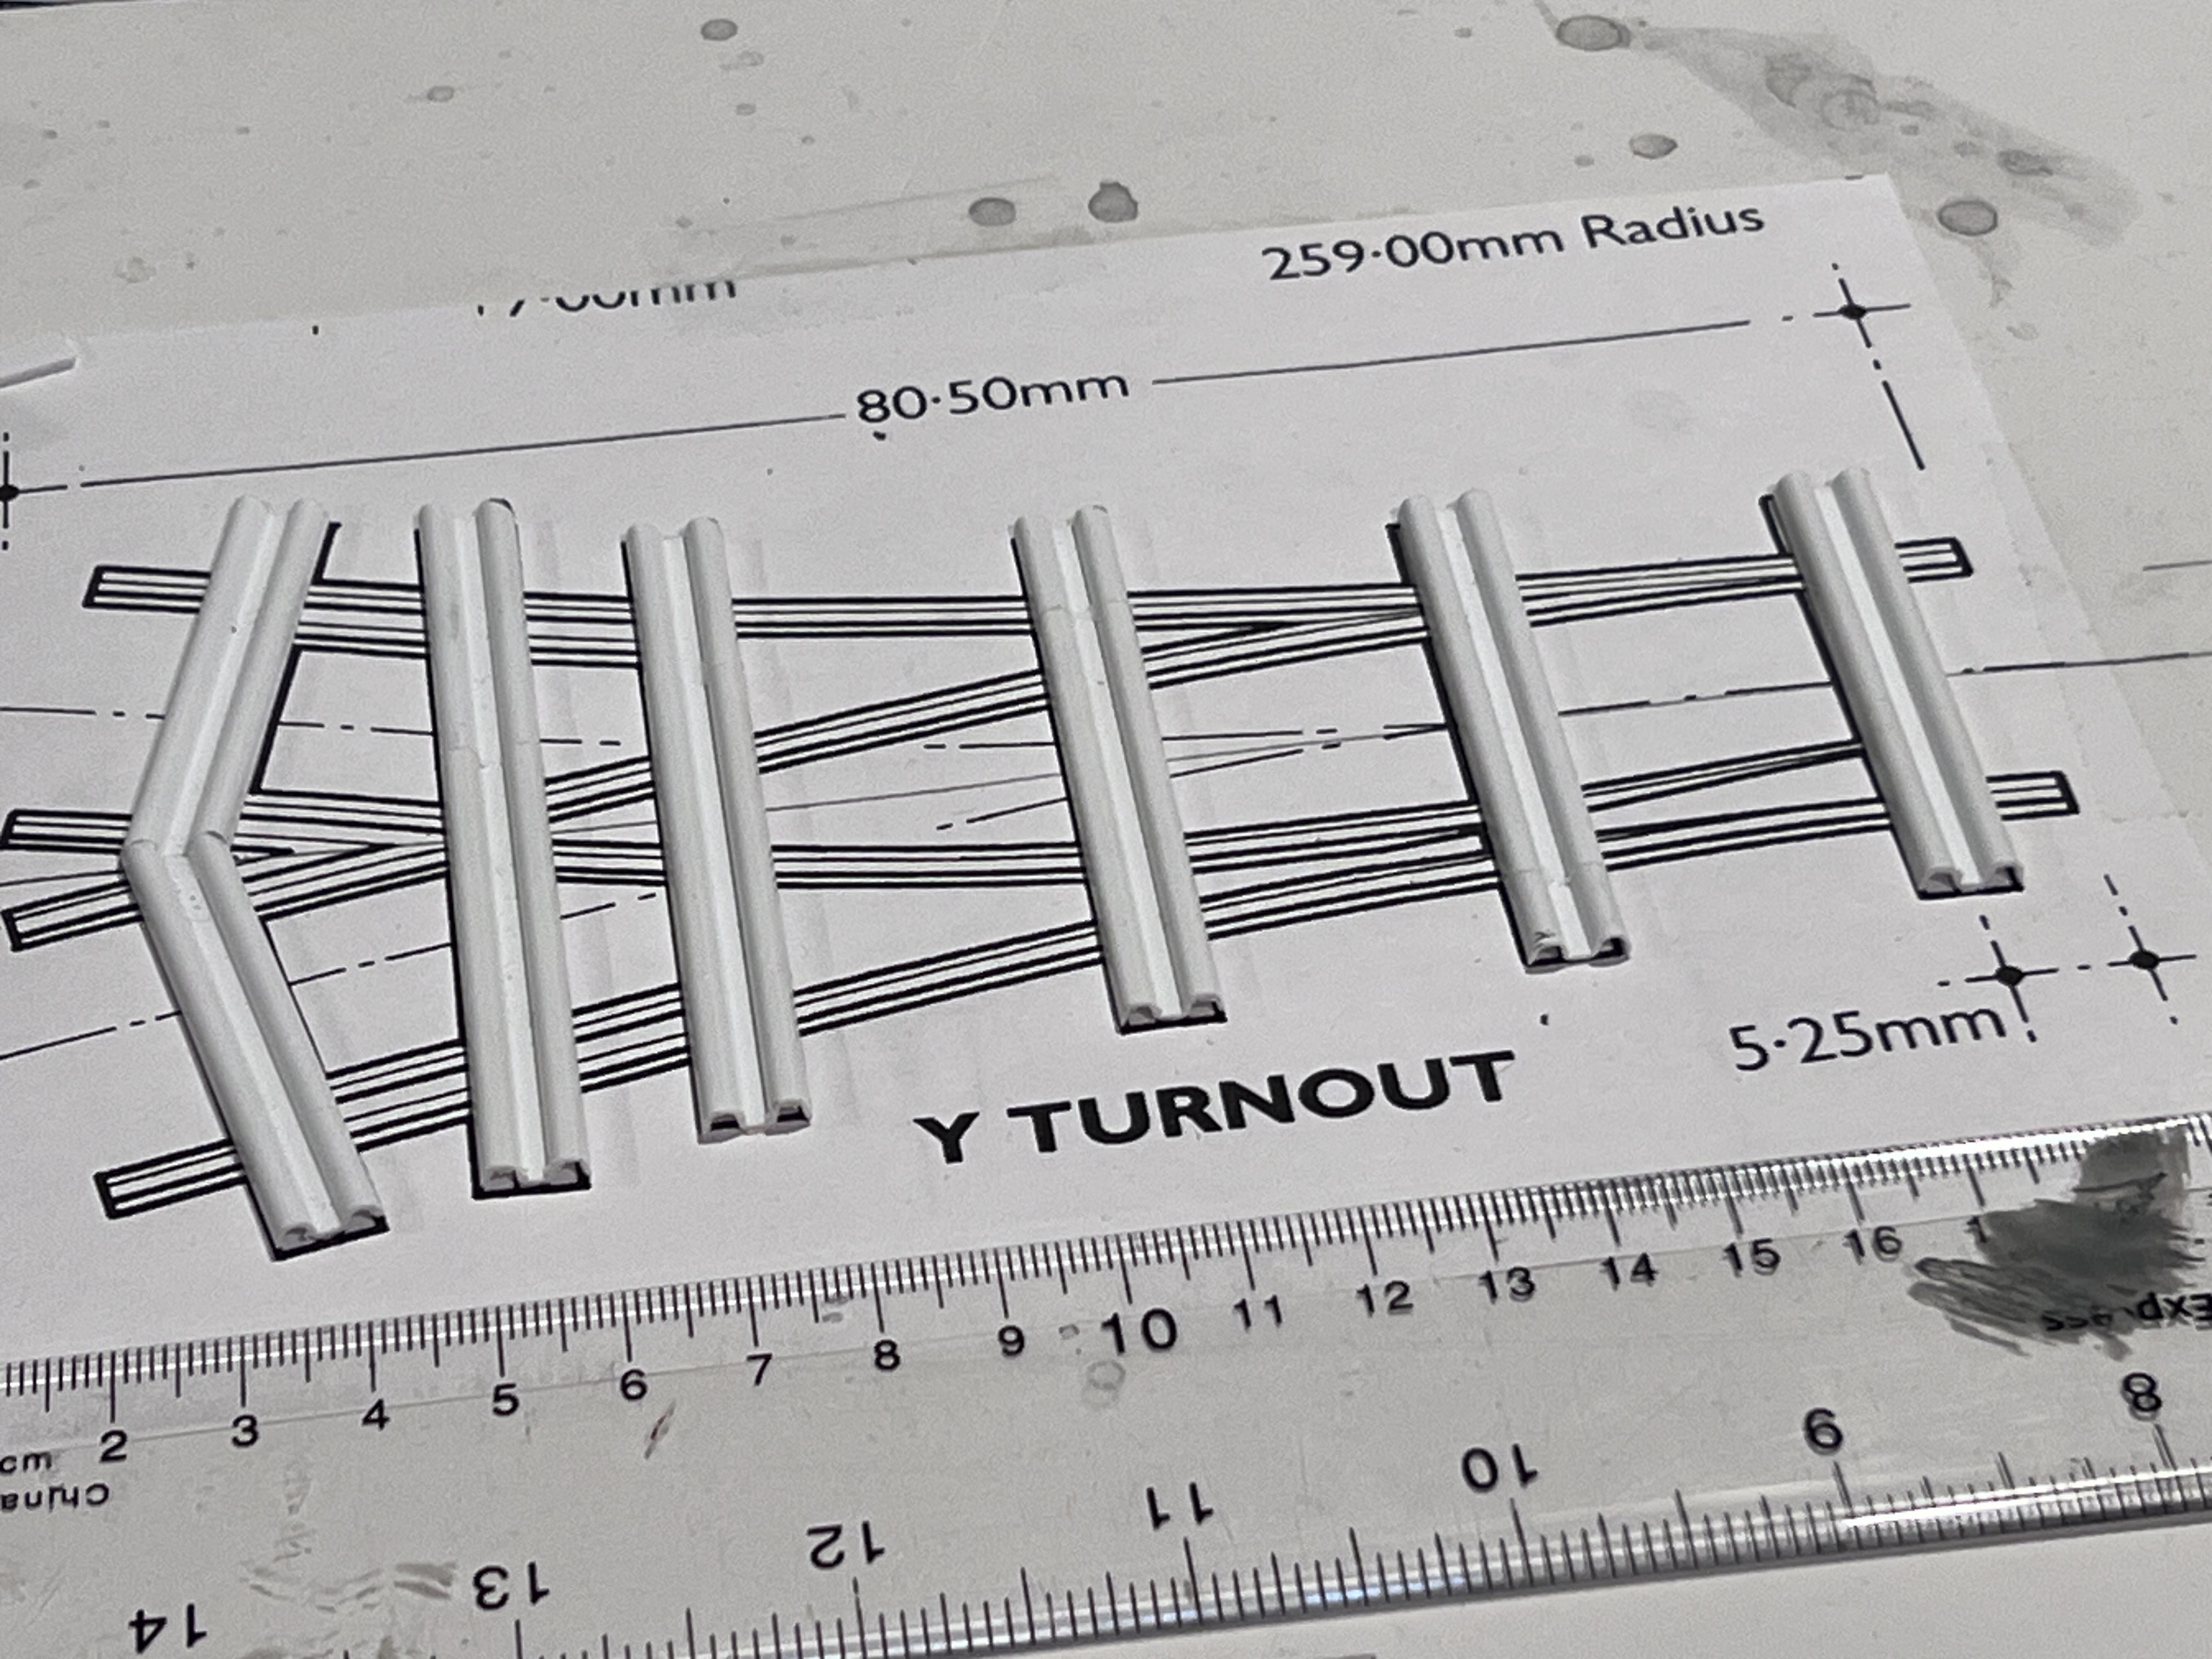
I’ve been building a turnout. You’ll all be familiar with my method of building plain track using Plastruct embossed corrugated sheet. I needed to know if this construction method would work for turnouts. I know there’s lots of people 3D printing turnouts, and I may well go that way. But first I have to know if my method of track building would work. 
I decided to build a Y turnout from the drawing in the late Roy Link’s Industrial narrow gauge handbook.
I enlarged the drawing to size and got to work. I shall try not to bore you with a ‘How I blew my nose” approach to describing the work. Just list the significant steps. Suffice to say the method of building turnouts is little different whatever scale or track you use.

The template from the Roy Link handbook, blown up  and taped on a board. During an earlier rush of blood to the head, I had cut all my embossed styrene into sleeper lengths. In order to get the correct length sleepers I had to glue them together. Each butt joint was reinforced with styrene strip in the channels.

A lot of people asked me about my railbender. This is it. I found it on eBay from a seller called harrgar52. It looks to be an adaptation of the tool for removing watch backs, that has been described in the model railway press in the past.

Stage 1. Cut all the sections of rail to size. I made multiple easy passes through the railbender in order to get the curvature correct. The rail came from some sections of Atlas O scale 2 rail track. I think that makes it code 148. 
A simple jig was needed for the crossing vee. Just a couple of pieces of wood set to the correct angle. Filing the rails to the correct angle of the vee, gave me a good idea of how much rail would have to be removed for the blades. A lot.

Then I had to leave the project for a couple of weeks as I prepared to run my 24th marathon.


Thursday, January 26, 2023

Pause, reflect

I've reached that stage.  I'm the vast majority of the way through the layouts construction. It's just detailing work to do. I can add bits and pieces here and there to my hearts content to make the scene looked lived in. Like a place of work should. There's so many little things to be done, or could be done. But what? Time to pause and reflect. Here's some things to think about.

To do: Detail the workshop with tools and other rubbish. Perhaps a delightfully dated, (maybe some will say sexist), pinup poster on a wall. The workshop will need properly bedding in, like all the structures on the layout. In the future, I may also run a short section of panel track into the workshop to model a wagon under repair.
 
To do: Do I need to do more? I could add pipe, or girders, bag of cement, and even more wood to a pile of workplace junk. But would it achieve anything extra to what's already suggested here?

Quite a nice vista. Not a view that the regular layout viewer would see.
To do: Anything? Right now I can't think of anything much. A new viewpoint like this can make you think. How about a rack of steel sections in front of the sheeted over items maybe?

To do: Why is that ladder up against the gutter? Is he going to clear the gutters out? I once had a sunflower growing in one of the gutters of my garage. Weeds in the gutter to add to the scene then. The door does need a handle though.

Just messing around. To do: More tension needed in the weighted down ropes that hold the tarpaulin in place.

This is good. Seriously, I might not ever top this as a vignette where I set out to do something and achieved what I set out to do. Nothing else needed here.

Aerial view. There's a surprising amount of space to fill. If I wanted to, that is.

From this view you can see all three tracks, as set out on Carl Arendt's original Squarefoot estate railway layout.
I have a couple more Binnie skips to build, and as you know I plan to model those as fairly new and free of damage. There's a Motor Rail kit coming from LocoRemote too. Then there's an 'Issing Sid kit to build for fun. All those items will need painting, and it's too cold here in Minnesota to go down to the garage and spray paint things right now. Perhaps I will have to wait until March to do that job. The only truly major task to do is to devise the tipper to fill the wagons. I have a few ideas on that, it just needs fine tuning to fit the location. So perhaps there won't be much activity on here in the coming weeks. We'll see. 

What do you think I could add? Reply here or wherever you were referred from, either Facebook, NGRMOnline, or Voie Libre. I'd be interested in feedback. 

*It should be noted that the figures aren't painted for a reason. My wife wants to paint those. So I'm leaving them well alone.

Monday, August 29, 2022

Track laying.

 At some point I have to face the laying of the track for this layout. I've been putting it off for a while, using the excuse of lack of inspiration for the model. But that's no excuse, the track plan is set in stone. I'd even glued the sleepers down.

To be honest, I was reticent about bending the rail. That's all. I remember bending some code 100 using a Roy C Link rail bender and I struggled a bit. Naturally I thought that Code 125 being a bigger rail section would be harder to work with. 

The tools after the job was done
I sourced a larger rail bender off eBay for a reasonable price. There are some very expensive ones out there, that was another factor in the delay of work. I wasn’t going to spend over $100 on one. 
The spikes were large ones from Micro Engineering. I figured working in a large scale, large spikes would work the best. A pair of spiking pliers are a necessity. Finally a small sharp point for poking through the sleepers to start the spiking. 

Away we go!
First off, I should be honest and say that I didn't enjoy the process too much. I was enthralled with the fact that I was discovering a new technique. But it wasn't a technique I was excited by. Yes, it's the only way to do what I want with the track work, but I certainly wouldn't want to do it on a large layout. Perhaps years and years of laying PECO flexible track have spoiled me. On the other hand it may be a technique you have to be in the mood for. Like when I painted the sleepers on T gauge track.
Onto the process itself.
Pre bending the track came first, and I made several easy passes through the rail bender to make sure I got the curve right, or at least close. I marked up the track before hand and managed to leave a section straight before the curve. Then I spiked the first rail in place, following a line I drew on the tops of the sleepers. 
Starter hole
First I punctured the sleeper with a sharp point so that I didn't have to shove the spike through the sleeper. I wondered if the force of pushing the spike might deform the sleeper and break the glue bond. At least this way they didn't. My chosen adhesive is an outdoor grade extra strength woodworking glue from Elmers. It seems to hold the ties in place well.
Spiking away
Spiking was an unremarkable task. Punch the sleeper, push the spike in. Punch the sleeper, push the spike in, and so on.
You can see that I used an NMRA standards plate gauge to keep the track in gauge. The instructions with one, say it's not recommended for track laying. But as I wan't doing any soldering or gluing or anything I thought I was safe. Putting the second rail in is the same as the first. Punch the sleeper, push the spike in. Punch the sleeper, push the spike in. I think this is a task you have to be in the mood to do. Like I said, I was a little excited at learning a new skill, but I wouldn't want to do it for more than a couple of hours at a time. The great joy with a micro layout is that you can very easily see the end of the job in hand. 
After two stints over two evenings, with no points/switches to lay, I have the track laid.
Track laid. Job done!
This was the task I was dreading the most, completed, and as my locomotives are going to operated by the LocoRemote WiFI system I don't even have to worry about wiring. Another least favourite task dealt with.  This might be as far as things go for a while because I really have to finish off my APA box layout ready for Trainfest in Milwaukee. Maybe I can work on both at the same time...


*Fy Merlen Bach*

Winter is coming…The phrase that spawned hundreds of cringeworthy internet memes. To me it means that any model making I do will be confined...