Tuesday, August 30, 2022

How (not) to design a Micro

The German film director Fritz Lang once said. "To begin with I should say that I am a visual person. I experience with my eyes and never, or only rarely with my ears - to my constant regret." 

My world of designing micro layouts is very much similar. It's a visual thing. I experience it only with my eyes, Rarely with any logic. I think in images, scenes, cameos, as perhaps James Hilton would call them and fit them into a layout. James' website is full of sketches of great schemes for model railways. I excitedly wait for his book on layout design to arrive from the UK. 

Chris Mears, another model railroader whose blog I read regularly, writes at length about the visual aspect of layout design and the importance of working on paper. 

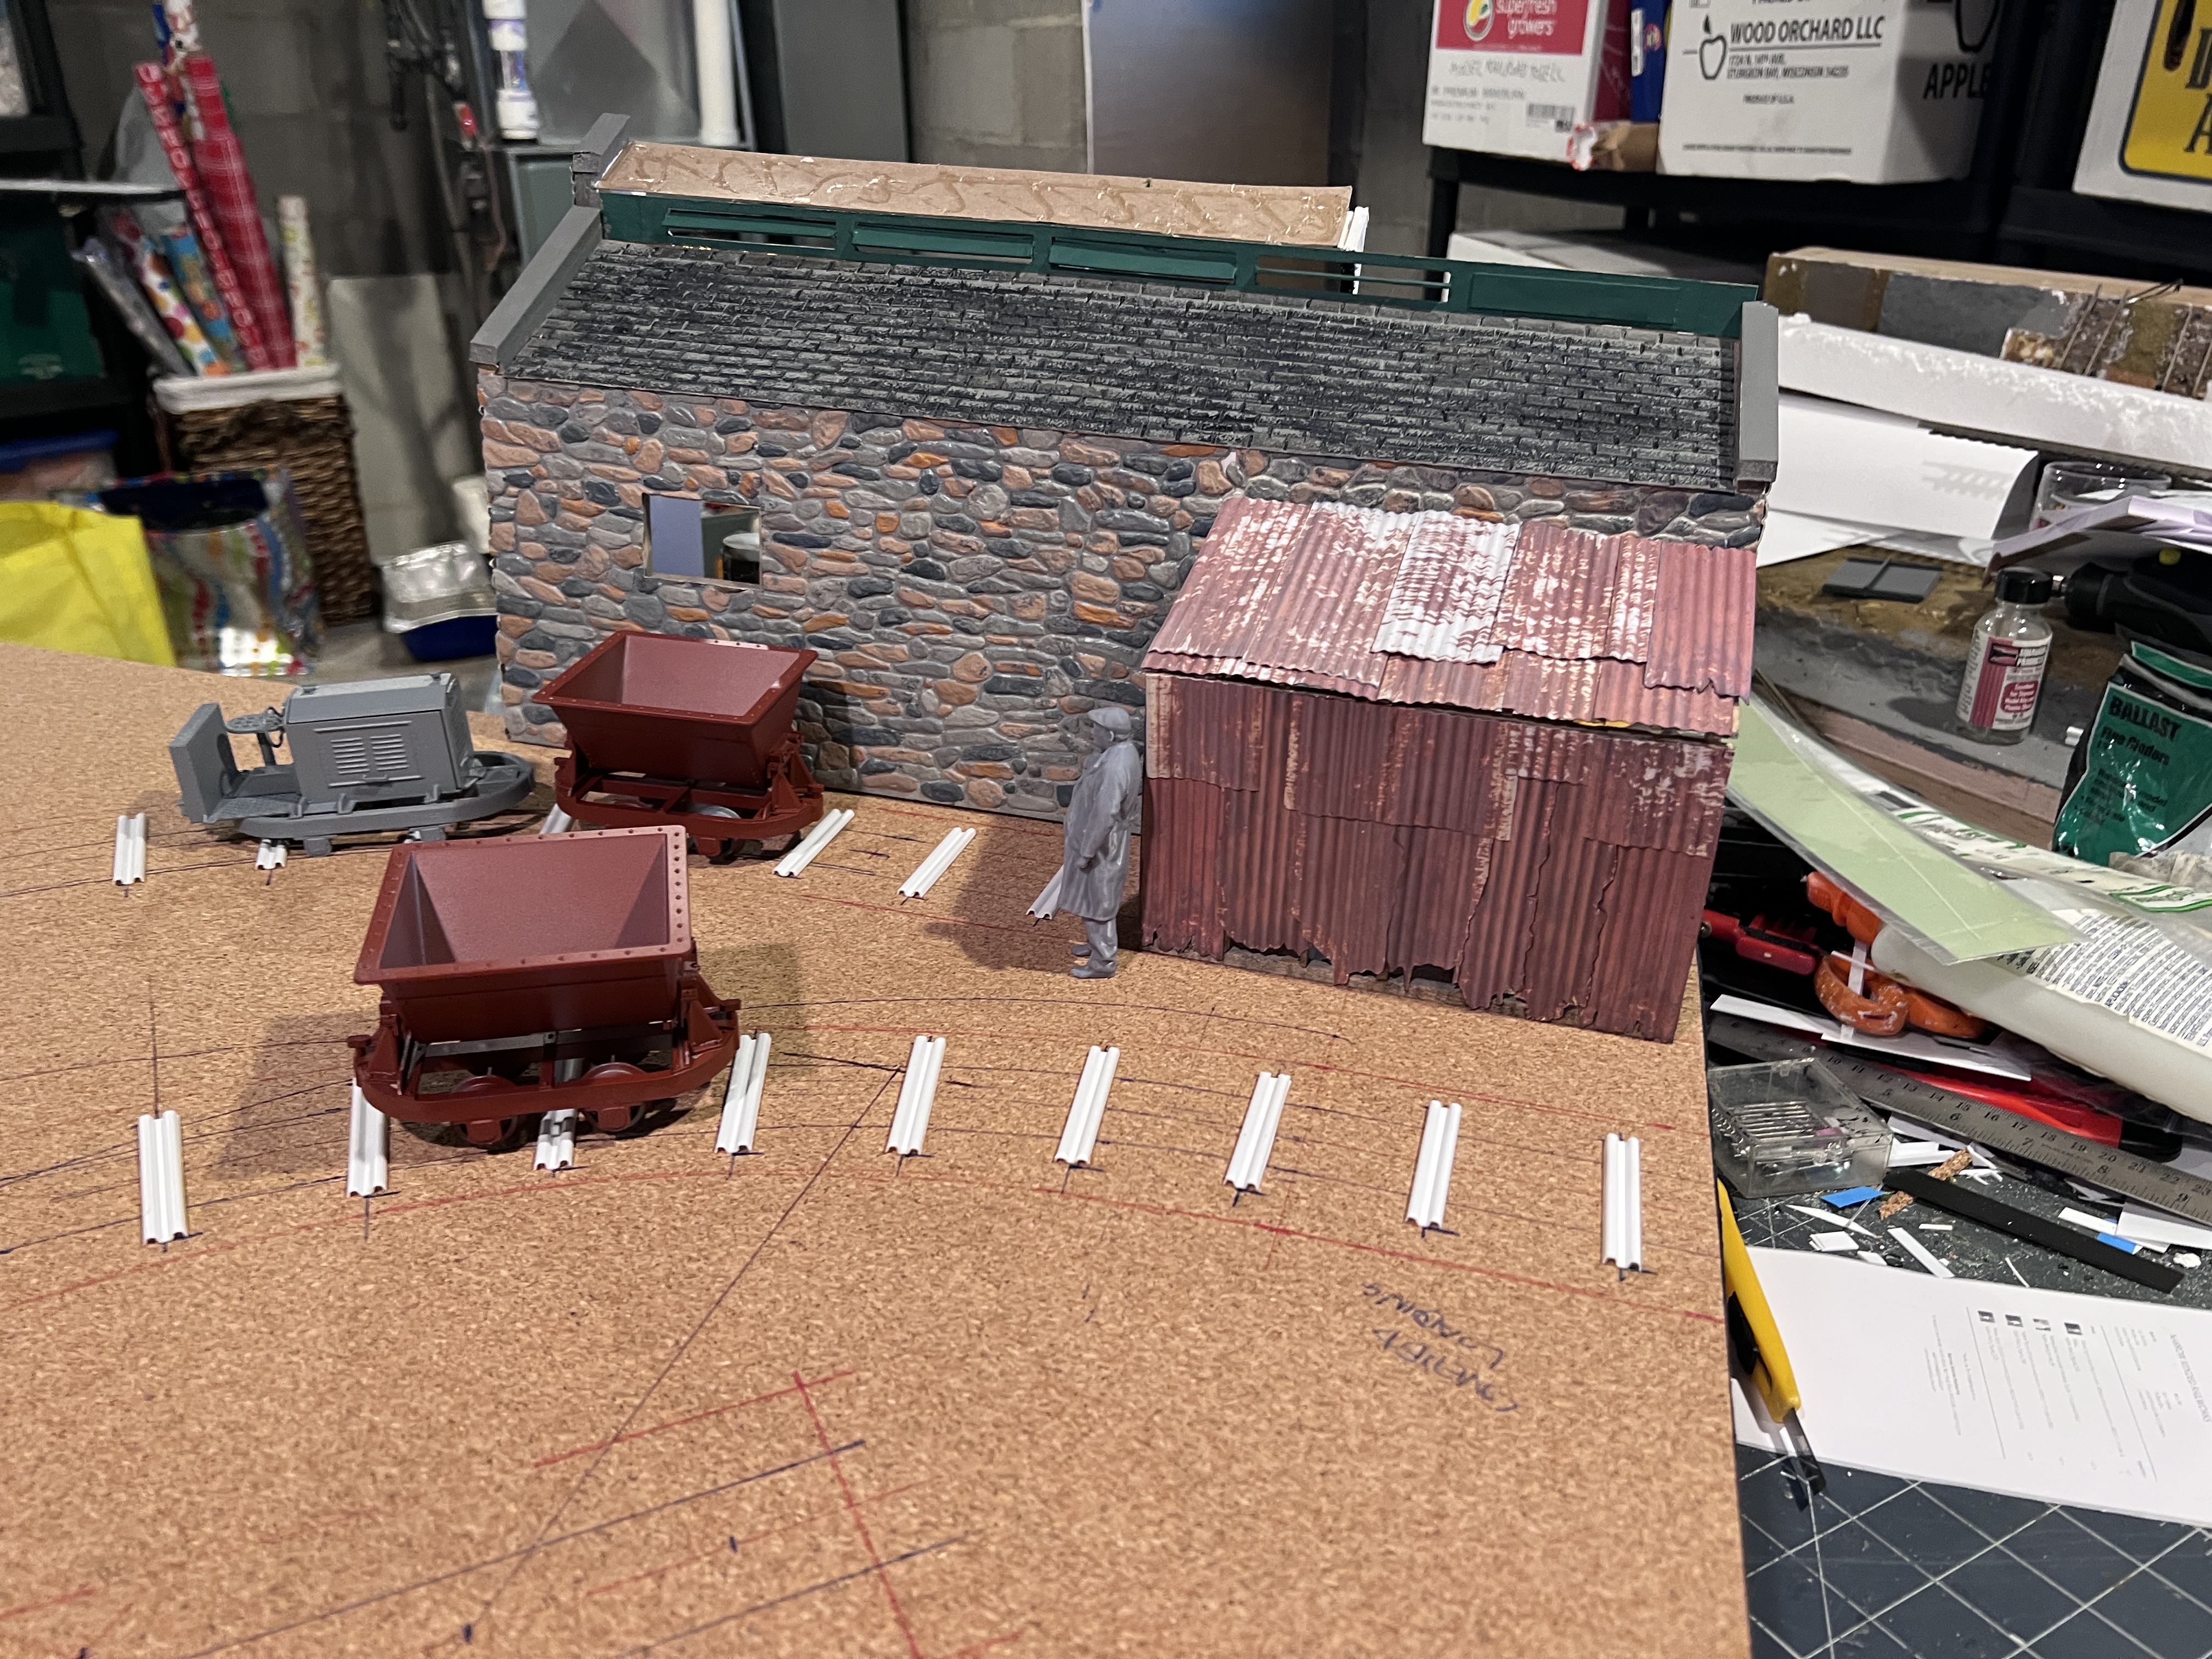
So when I cobbled together this scene that has kickstarted progress on my Christmas Challenge Micro I had to see how I could fit a layout around it.

What's it going to be?

How does this scene fit in? This is where problems begin. Saner people than I will have a more logical flow to layout design. They’ll say they’re going to design a small peat works layout for example. Some aspects of the layout are taken care of in that statement. What the structures can look like and how trains operate are dictated by the industry. 
Me? I’ve come up with a scene and a track plan independent of each other and now need to make them fit into a layout concept. It’s “arse about face” as some would say. 
It’s these times when the sketches are so important for me, as I try to visualise a locale, a site for the scheme, and a rationale for the project.
Sometimes ideas come so thick and fast it can be difficult to get them down.
Is that a rock face? Or a retaining wall? Should the awning cover the unloading point, or should I make it a lean to engine shed? These ideas zip through my brain faster than I can draw (or even type in this post) Sketches become light, ephemeral scratches on the paper. The idea may have gone before I can fully visualise it. But the feeling about the idea remains because I have the scratches on paper. 
I have to slow down and ask myself questions.
What material would be transported in skip wagons to be processed into something or other?

Ephemeral scratches

Clay perhaps, that would be a first thought. Though if this was to be a brick or tile works, a slope to winch wagons up to the top level of a Pug Mill would be in order on the layout. Though my old pre-Purespring Watercress layout, Cuplars fine tile and Ceramics didn’t have one.

Those scratches are Marram Grass. Really.

Then there’s this sketch. I’m just trying to establish what I might do to cover the exit to the sector plate.  I scratched some long grass onto the top of the “hill” that covers the hidden siding. “That looks like Marram Grass.” I thought.  Wham! A whole concept hits me instantly 
Salt. 
The Lincolnshire (UK) coast has miles and miles of Salt marsh. Salt has been produced there since Roman times. Continued inundations from the sea had pretty much killed the industry off by the 1800’s though. 
This micro layout scene could represent a small salt works that has survived into the 20th or even 21st century just behind the sand hills and sea defences. A loco shoves a couple of skips onto the layout. Appearing ostensibly, through a gated gap in the sea barrier to have the skips emptied at the structure. Then it shuffles off back to the saltern to collect more salt.
A fun idea that incorporates a lot of history from my home county just up the road from where I used to live.
But that photograph recycles the structures from my Tribute to Cuddle project from a couple of years ago. 
The original Cuddle, by the late Andy Anderson, was an exploration of the Shale oil industry on the south coast of England and the original layout was an idea based around operating a layout that was only a single length of track. 
For my version of the layout I had built the main structure and awning that you see. A combination stone and brick chimney that I’m quite proud of and a shale oil condenser that boggles my mind when I think of the effort I put in to it. Then the project stalled. I put a lot of effort into all of the structures. It would be a shame not to use them. 
Could I use the stone built structures for a small Lincolnshire saltworks? Maybe, maybe not. It’s unlikely that there would be any stone built structures on the Lincolnshire coast. There’s no stone for miles. Any structure hereabouts would probably be wood or brick depending on their permanence. 
What would a small salt works even look like? Would a salt works have a chimney? Is heat needed in the process? Then there’s my gas condenser, I doubt there’s any need for one of those at a small salt works.

There you are. I’m not a lot further on deciding on a concept for the layout. It could be a salt works, it could be a shale oil gas plant. 
This may not be the best way to design a layout. But at times, when the ideas flow, it’s quite exhilarating. 

Monday, August 29, 2022

Track laying.

 At some point I have to face the laying of the track for this layout. I've been putting it off for a while, using the excuse of lack of inspiration for the model. But that's no excuse, the track plan is set in stone. I'd even glued the sleepers down.

To be honest, I was reticent about bending the rail. That's all. I remember bending some code 100 using a Roy C Link rail bender and I struggled a bit. Naturally I thought that Code 125 being a bigger rail section would be harder to work with. 

The tools after the job was done
I sourced a larger rail bender off eBay for a reasonable price. There are some very expensive ones out there, that was another factor in the delay of work. I wasn’t going to spend over $100 on one. 
The spikes were large ones from Micro Engineering. I figured working in a large scale, large spikes would work the best. A pair of spiking pliers are a necessity. Finally a small sharp point for poking through the sleepers to start the spiking. 

Away we go!
First off, I should be honest and say that I didn't enjoy the process too much. I was enthralled with the fact that I was discovering a new technique. But it wasn't a technique I was excited by. Yes, it's the only way to do what I want with the track work, but I certainly wouldn't want to do it on a large layout. Perhaps years and years of laying PECO flexible track have spoiled me. On the other hand it may be a technique you have to be in the mood for. Like when I painted the sleepers on T gauge track.
Onto the process itself.
Pre bending the track came first, and I made several easy passes through the rail bender to make sure I got the curve right, or at least close. I marked up the track before hand and managed to leave a section straight before the curve. Then I spiked the first rail in place, following a line I drew on the tops of the sleepers. 
Starter hole
First I punctured the sleeper with a sharp point so that I didn't have to shove the spike through the sleeper. I wondered if the force of pushing the spike might deform the sleeper and break the glue bond. At least this way they didn't. My chosen adhesive is an outdoor grade extra strength woodworking glue from Elmers. It seems to hold the ties in place well.
Spiking away
Spiking was an unremarkable task. Punch the sleeper, push the spike in. Punch the sleeper, push the spike in, and so on.
You can see that I used an NMRA standards plate gauge to keep the track in gauge. The instructions with one, say it's not recommended for track laying. But as I wan't doing any soldering or gluing or anything I thought I was safe. Putting the second rail in is the same as the first. Punch the sleeper, push the spike in. Punch the sleeper, push the spike in. I think this is a task you have to be in the mood to do. Like I said, I was a little excited at learning a new skill, but I wouldn't want to do it for more than a couple of hours at a time. The great joy with a micro layout is that you can very easily see the end of the job in hand. 
After two stints over two evenings, with no points/switches to lay, I have the track laid.
Track laid. Job done!
This was the task I was dreading the most, completed, and as my locomotives are going to operated by the LocoRemote WiFI system I don't even have to worry about wiring. Another least favourite task dealt with.  This might be as far as things go for a while because I really have to finish off my APA box layout ready for Trainfest in Milwaukee. Maybe I can work on both at the same time...


Saturday, August 27, 2022

Something is stirring

You remember in the previous post, I mentioned that I'd offer up 16mm scale people to the little scene I cobbled together at the start of the week.

That works!
There's no doubt about it, a 16mm person from Narrow Minded Railworks fits perfectly. The proportions are fine. 
I decided to see how I could fit this into my challenge baseboard.
First mock up.
To orientate yourself. On the original Squarefoot you would be looking over the structure towards the front of the layout. Clearly there's plenty of room here to make things fit.
Oh, I say!
Then I got down to eye level, and it's fair to say that my breath was taken away. There really is a lot of space in this view. To orientate you again, on the original plan, you're looking from the right hand edge.
There will have to be something, a rock face perhaps, on the right hand side that will help to hide the fiddle yard track. The big structure would be better served being low relief in this situation. In my minds eye I can see, puddles, oil barrels, sheeted down machinery and other detritus in that space between the two sidings. This does feel promising.
One thing I've always wanted to feature in a layout, is having trains that run up and down the scene, into it. Rather than passing across it. This arrangement would certainly facilitate that.
For everyone who wants a trackplan


I certainly think there's room for some further development of the idea. What do you think?


Friday, August 26, 2022

Where and when does inspiration strike?

 I have been having a lot of trouble lately coming up with inspiration for my Micro Model Railroad Cartel Christmas Challenge layout. The track plan is pretty much set in stone, per the challenge rules. I just need some inspiration to get me going. I've shared some other sketches of ideas in my previous post. But right now, I'm devoid of motivation. Totally and utterly. Nothing. 

I've seen a few pictures that piqued my interest, but I've since lost those pictures through the magic of Facebook. So the baseboard sits in the corner of the basement. Sleepers down but no rails in place. 

Then on Monday, in need of a picture for a post on my Micro Model Railway Dispatch page. I cobbled together the scene below. 

Cobbled together being the operative word. There's my 7/8ths inch scale 18" gauge track project as featured in the NGIRM Review issue 127. A 16mm scale Binnie Hudson skip, and the shelter and stone wall from my 1/2" scale tribute to Cuddle. Several unfinished, abandoned projects there. I made the post and thought nothing of it.

Can you hear this image speaking to you?
Then a few days later I went back to the image. This time it was different. The image spoke to me. To me, there's an indiscernible quality in there. Squint at it, soften the hard edges, and take the background out. Is it speaking to you yet? I’m seeing a rain soaked scene. Puddles and mud abound. A locomotive shoves a couple of skips filled with something under the awning. They’re emptied and the loco shuffles off back to where it came from.

It doesn't matter that nothing in this image is to a consistent scale. It’s the feeling it evokes. To me it feels believable. A rundown, ramshackle operation. 
Could this hodgepodge of bits and pieces be translated into a scale “whole”? Does it need to be? 
Let’s consider the elements in the scene. That wall of whatever building it is. It’s built of stone. Big stones, smaller stones. Stones are stones. Big ones in 1/2” scale will be smaller ones in 16mm. So no problem there. 
How about the roofing tiles/slates? OK, I might need to replace them. Though the Welsh Slate website lists 14 different sizes of roofing slates, so perhaps something comes close to what is on the roof as it is. Maybe this structure might end up as a low relief flat so roofing might be a negligible moot point. 
The awning. Perhaps that needs a wholesale replacement, perhaps not. That rusting corrugated sheeting was created by running printed downloadable textures through a Fiskars crimper. A bit oversized for 1/2” scale. Perhaps closer to scale for 16mm. I have some dolls house size corrugated material that’s probably too large. 
The wooden frame for the awning? Let’s be honest, you can hardly see it. I think I could get away with that. I’d certainly offer up a 16mm scale person to see how they stood up against the height of the awning. But if it’s close I’d probably let it go.
All in all, this is not going to be an exact scale model like the late Roy C. Link would produce. It’s going to be an atmospheric piece of fun. So why not leave it as it is.
It's strange how an image I created for fun, quickly developed. Quite how it's going to pan out yet. I don't know. But I might be on the road to starting my challenge layout at long last.

Tuesday, August 9, 2022

The Layout

 The challenge I set for members of the Micro Model Railroad Cartel for the 2022 Christmas Challenge was to recreate Carl Arendt’s seminal layout in whatever scale/gauge combination the entrant liked as long as it kept below the traditional 4 square foot area limit. For those not familiar with the plan. This is it, shorn of all details. Mirror image versions are acceptable, the proportions could be stretched in one direction or the other. Just as long as the basic elements are there. Two curved sidings, one straight one and a sector plate with a pivot point in the corner.

Squarefoot Trackplan
If you are a member of the Cartel on Facebook you will have seem some interesting interpretations already. It’s shaping up to be quite the exciting challenge.
Me? I was feeling pretty unremarkable in my interpretation. My plan is for a straightforward enlargement of the original plan to fit the maximum area. The final subject is as yet undecided, as I feel its the scenic treatment that could set it apart from other entries.
I’ve had a few ideas, but yet nothing has grabbed me.

Perhaps a Mine

Perhaps something industrial

Perhaps something more like the original

Right now, I honestly don’t know. A couple of weeks ago, I saw some interesting pictures of a Forest of Dean freemine that would fit this track arrangement. 
I do need inspiration to strike soon otherwise I’m going to be in trouble.
But I do have a baseboard with some sleepers down…
Challenge entry, so far…


Monday, August 8, 2022

LocoRemote Huddy construction part one.

 Covid.

The vast majority of us have succumbed to it at some time in the past two years. I had gone two years, Two vaccinations and a booster shot and not been troubled by it. I’d become complacent. I don’t know where I’d come into contact with someone. Culver’s maybe. Perhaps Starbucks. Maybe even the airport. No matter. I got it and ended up with seven days off work. I needed to do something. I have plenty of model railway projects on the go, but I wasn’t in the mood. Then it hit me. My Huddy kit.

My plan, which will become apparent as the blog goes on, is to build a 16mm scale layout for the Micro Model Railway Cartel Christmas challenge. More of that in another post, it will be a simple enlargement of the late Carl Arendt’s Sqaurefoot estate railway. The layout will need a loco and, by golly! I was in the mood to build one!

My experience with 3D printed kits is limited, but positive. The kits I have made from 6.5MinimumGauge have been excellent, and as those were tiny and these 16mm kits are huge. I felt really good about approaching the construction of one. 

The quality of the prints is outstanding. The fit of the parts is nothing short of perfect. The axle holes on the wheels needed a little work with a needle file in order to fit them and get them to gauge. But apart from that, I haven’t had to file anything to fit. It all went together so easily. Nothing dropped out of its location as I test fitted everything. In a few minutes, I had a simple locomotive that sat in the palm of my hand.

A simple locomotive body. A palette for your creativity
A very simple body. One that just screams out. “Detail me!” As I was waiting for batteries for the remote control unit to arrive, detailing was going to be done.
I don’t know much about narrow gauge industrial locomotives, So I referred to the internet for inspirational images. The version of the kit I have bore some resemblances to O&K locos and the Ransomes and Rapier at Amberley. The Rapier was my first scratch built loco in Gn15, so I have an affinity for it, so it seems quite natural that some details would end up on this model.
I reached for my stock of Evergreen Styrene sections and started to block things out.
Exhaust pipe
First up, was the exhaust pipe. Photographs of O&K critters seemed to indicate that a short, stubby one was in order. But what size would an exhaust pipe be? I went out to my Model T Ford and measured that one. Just under two inches. Unfortunately I didn’t have any tube of the right size so I drilled out a section of rod.

I drilled out the center of the rod carefully by hand. It went very well as you can see. I only needed the one attempt at it.

First attempt at details
Then I set to work, blocking out the other details. Radiator filler cap and fuel filler caps were a must and easily put together using sections of styrene rod. A large sized tube and angle concocted a reasonable transmission tunnel. The distinctly odd pedestal for the brake wheel was found in an image of an O&K loco. But as the only wheel I could find in my bits box was from a 1:24 scale BMW Dixi. I decided that wouldn’t work and tried to come up with something else.
Ransomes and Rapier inspired detailing
With my liking for the Rapier, I decided to try some cab details inspired by it. I was really pleased with the location of the brake wheel and the smaller transmission tunnel. The dials were a nice extra touch, though I'm not sure that the Rapier has any. The square rod used to recreate something or other in the prototype cab I was less enthused about, however. 
The final cab version
Now we are getting somewhere. The cab is now open with lots of room for whatever driver I choose to put in there. All it needed was the removal of those bars. Another detail I would like to add would be pedals and levers. But those are dictated by what kind of driver figure I have. The handle on the engine compartment was cut from some square tube but will be replaced by handles bent up from wire when the time comes.
It’s a Huddy
The final bit of detail I felt compelled to add was a nameplate/builders plate. Ever since Pam one of my early Gn15 locos when I made an Alan Keef nameplate. It’s a detail I’ve wanted to create on loco’s. Luckily I had enough letters (just) from a 30 year old sheet of Slaters 2.5mm alphabet to make up the word “Huddy”. It might be a little on the large side but the Ransomes and Rapier plate on the front of that loco is very noticeable. 
Anyway, that’s stage 1. So far assembly has been a lot of fun. The base kit is simple and easy to put together. When the batteries for the remote control unit arrived I will assemble the rest of the loco.
As I assembled everything I remembered what it was like in the early days of Gn15 and how much fun I had putting together Steve Bennett’s “Sidelines” kits. This was so like that. Those kits set me on a very productive period of railway modelling. Perhaps these LocoRemote kits can set me on the same way in 16mm scale. 


Sunday, August 7, 2022

Introductory

 Those of you who know my model railway habits, know that when I work on a project I tend to blog about it. I have many projects on the go, so I can have many blogs on the go. You’ll have seen the work on Facebook. Facebook is good for instantaneous, simple posts. But if you want to go into detail, then the blog format can’t be beat. 

The 16mm scale project has been bubbling under for quite some time. Ever since the days of my dalliance with 7/8ths scale. I was really grabbed by this large scale, and was working quite well towards getting something running. I had developed a track construction method, as featured in Narrow Gauge and Industrial Railway Modelling Review (issue 127). I had built some rolling stock and had an interesting locomotive coming along. But when I got to the structures, I hit a wall of realization. The level of detail that can be achieved, was way beyond anything I could dream of. Hinges on doors should work for example. At the current time, that wall is insurmountable for me, psychologically anyway. I’m not sure that I could cope with that. 

16mm scale is a good bit smaller. About 25% smaller. Detailing can be lesser, though you only have to look through the late Roy C Link’s “Crowsnest Chronicles” book to see what level of detailing can be done. Right now, I’m OK with that. 

Coupled with all these thoughts going through my head was the introduction of some superb looking locomotive kits in 16mm scale from LocoRemote. The prototypes were quite different. A compressed air loco ‘Issing Sid. A small, freelance Hudson skip chassis based loco, “Huddy”, and the 4wheel Brush battery electric loco’s for the ministry of munitions. I was captivated by them all. In fact, I bought them all. I would have liked to have bought some of the other kits proprietor Chris Rennie had designed. But I had to stay realistic. I also had several Hudson skip kits from Peter Binnie for rolling stock. 

There I am. Three locomotives, four wagons and nowhere to run them.

Then Covid hit me…


*Fy Merlen Bach*

Winter is coming…The phrase that spawned hundreds of cringeworthy internet memes. To me it means that any model making I do will be confined...