Monday, October 9, 2023

Chute!

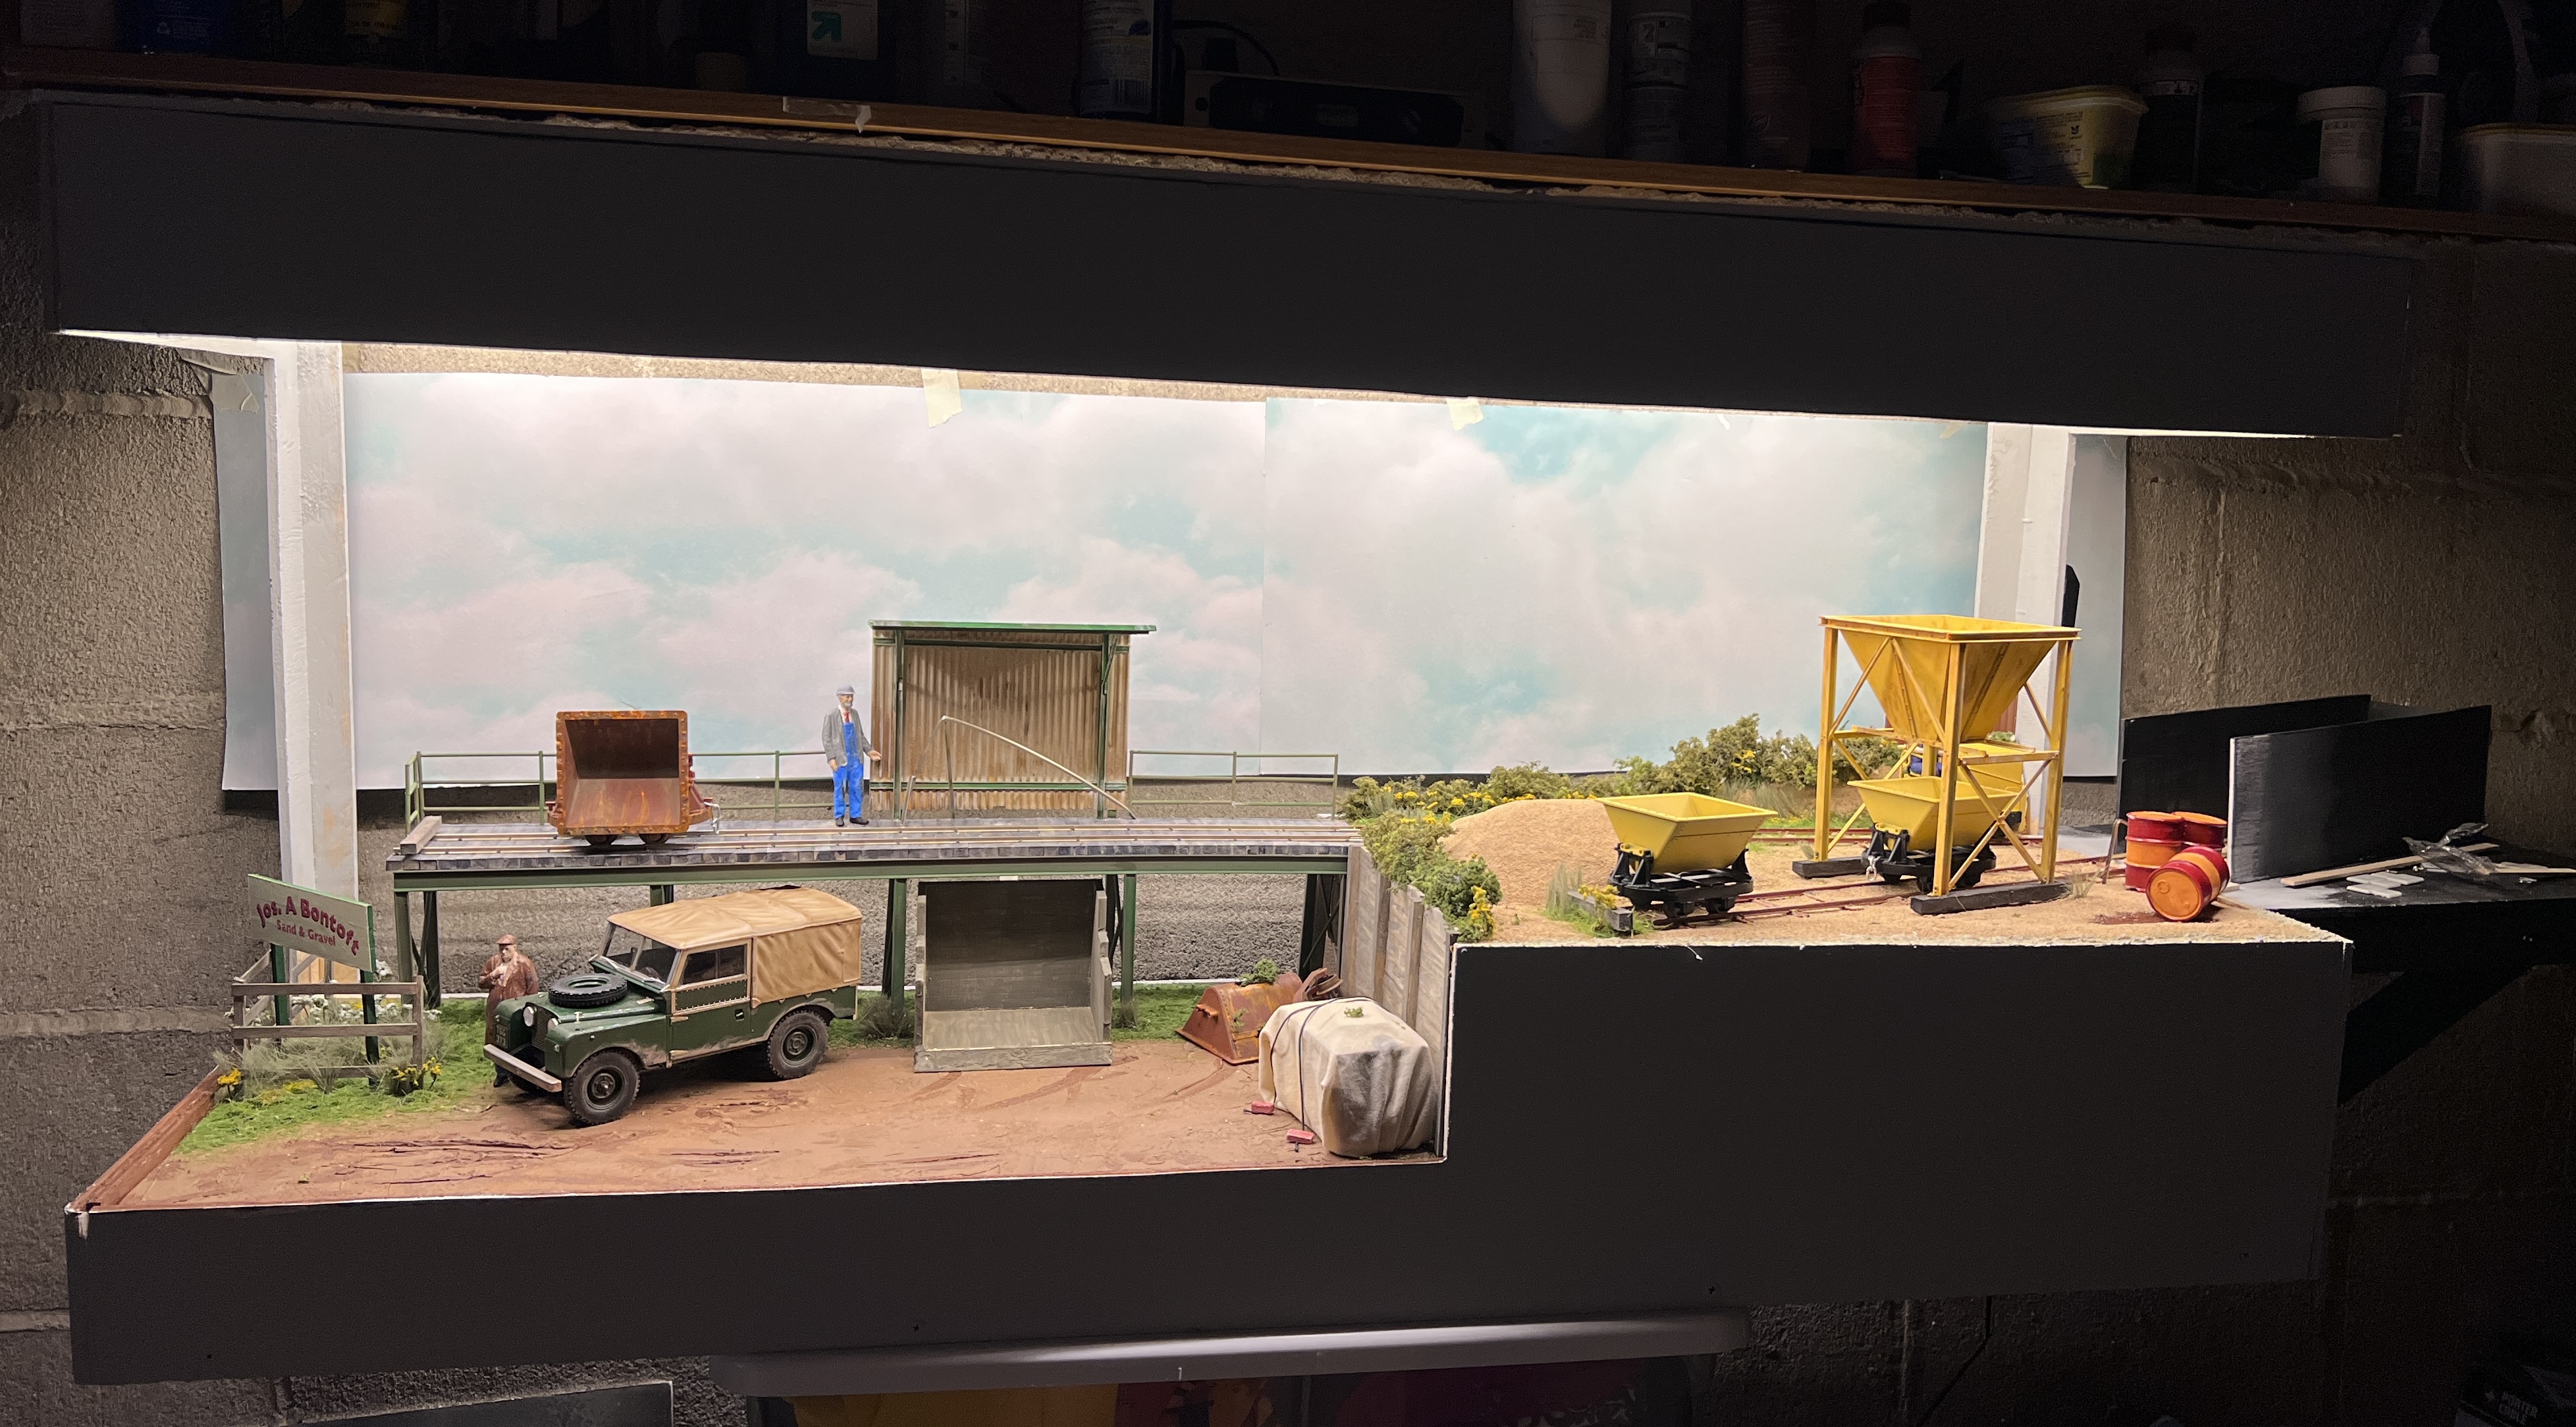
The chute is a great feature. I’m proud of the overall effect of it. However, the pouring of the sand needs slowing down. It’s gravity and mass, you can’t scale it down. 
I’m using Woodland Scenics” fine ballast for my sand and it just falls straight into the skips, and the “sand” can bounce out. I needed something to slow things down. A baffle, a filter. I knew I had some  3.5mm scale wire mesh fence that I thought would be perfect. But I couldn’t find it. (I bet it’s with the track spikes I can’t find). Then as I was doing the grocery shopping with my wife. I saw one of these.
A sink strainer
It was only a couple of dollars. I thought it was worth the experiment. I cut a section of mesh out of the strainer, and placed it in the chute and tried it. It slowed the flow down a great deal, but the material was clogging up the strainer. I guess that’s what the strainer is supposed to do. But not what I wanted it to. So I decided to make the holes larger. I kept poking at the mesh, making the holes larger, until I got a flow I was happy with. 
The filter in place
Tipping into the skip, thinned out and slowed down

A slower tip seems to result in a more rounded pile of sand
A new bucket
At the other end of the chute I added a new bucket. The original one was small and I had to fill it with a teaspoon. One spoon at a time. A pretty slow process. It was simple to make one large enough to take a skip loads worth of  “sand”. Having made one it seemed a sensible idea to make two of them. The second one would be used to fill the first. That way I’d get pretty much the same amount in the skip every time. That sounds like a winning idea to me.
Consistent filling
The skips are filled with a consistent amount, and the rounded pile of material is pleasing to the eye. This has really worked well. What do I work on next?

Friday, October 6, 2023

Taking (my) Stock

Now I’ve got a layout ready to go to an exhibition, I need a box to carry and protect the locomotives and rolling stock that I’ve accumulated. But what to make it from and how to make it? My woodworking skills are certainly not good enough to make anything.
But I run, I ski, I wear boots and shoes. I could make a stock box from a shoe box. They aren’t just for building micro layouts in. 
I have lots of shoe boxes around
All the boxes were different sizes. I just tried a few for size to see how the stock would fit best.
Not quite right.
This looks pretty good.
It only took to the second box for me to find a comfortable arrangement that would be easy to make.
I just cut some dividers to size and glued them in place. Easy peasey.
I’m quite happy with this fit.
A little padding in there might not go amiss, but things are in there pretty snugly, with a handy dandy spare pocket that for now will take coupler tools, couplings and other loose bits and bobs.

Wednesday, October 4, 2023

Clearing up the list

Let’s go through the list, tick off the things to do, then add some more, and then do them too.

Rusted rails on the deck and the tipper activator.

The legs look good. They create the impression that something is there,
but are not too noticeable
The legs that support the delivery chute were a task that took quite some time. As this is a last minute addition and not really planned, it had to fit the space available, and the stock had to stay clear of the legs. My LocoRemote “Amberley” Brush electric is the widest of my locos, and has given me some issues with the location of the “return bumper” that rights the skip buckets. So everything was measured against this.
My stock of Evergreen styrene yielded enough girder, tube and rod to construct it. Though as I say, the measuring, cutting and gluing took a lot of time to get everything to clear the stock and work smoothly. But it’s there now. A spray of a dark green colour hides it in the shadows. It creates the impression that something is there, but doesn’t overpower things and draw attention to the offstage area.
Yesterday I mentioned how I would add more weeds and the like to add to the overgrown feel. I also said I’d use grass tufts to help in the accurate locating of the bin. I’ve made a good start on that. But, it’s no exaggeration to say that weeds grow everywhere of course. 
Weeds help position the bin in the same place every time. 
More weeds needed yet, but you get the idea.
Things are starting to feel anti-climactic hereabouts. Thoughts have turned towards another layout project…

Tuesday, October 3, 2023

What to do next?

Three weeks to the layouts debut. The layout is essentially done. Now it’s just looking and finding things to do. Things like:
The rails here should be rusted.
After the euphoria of getting the chute to work had settled in. I began to think that it needed support legs so it didn’t hang in the sky so much. That needs some thought.
How to get the trains around the legs though?
Weeds and grass. I have lots of tufts. I could add a plenty more here and there to get the overgrown effect. Some places do need it.
There’s room for a lot of weeds on these bare patches
Weeds around this bin would help locate it in the right place after every emptying


Monday, October 2, 2023

Loads and loads

 With the end in sight, it was time to turn my attention to the last working feature. The loading of the skips. This was the one that I had the least concerns about. I’ve worked on so many layouts where I have loaded wagons and had so many problems and successes with the process that I had a pretty good idea what I was going to do. The basic idea was outlined in this post on my Cuddle blog. 
My plan was to have a chute appear from offstage and the sand (or whatever) would be tipped from the chute, into the hopper and then into the skip. Much thought has also been given to using a farm toy conveyor belt to transport the material. But as the conveyors I have found are overscale and will need some kind of converting, this chute idea will have to do for the moment.
The first task was to work out the shape of the chute to allow it to swing into and out of view.
First mock up of the chute.
For me, the only way to do this is cut away at pieces of card or add bits until what I want to happen, happens. It can definitely induce frustration when it doesn’t work as planned but I’m no engineer. I’m sure and engineer would be able to calculate the angle of swing of the chute and its size in a CAD program and very likely  produce something in a 3D printer. Alas, I have to work with my hands to get things to function. Most rewarding when it goes as planned. My first mock up seen above worked pretty well, and I decided I could go ahead with it with minimal modifications. 
The card version was reworked in styrene. The pictures below should give you an idea how it works.

The bucket carries enough material to 1/3 fill the skip, so the action has to be repeated for viewers
The angle of slope of the chute was steep enough that all the material in the bucket at the top was tipped into the skip bucket. I felt pretty pleased when that first load was tipped into the skip I can tell you.
Definitely a feel good occurrence

The chute was dressed with rusty corrugated styrene to make it less conspicuous
That’s it really. Job’s a good ‘un. The cord that raises and lowers the chute is just pinned out of the way when not needed.
Perhaps some will find the appearance of the chute from upon high jarring. But I think that will be overcome when people see the wagons being filled auto-magically. It also suggests that the action spreads beyond the confines of this blue grey box.
There’s a little fine tuning to be done, mainly to stop the overspill. I think a baffle inside the hopper would help direct the material into the skip, as well. Some kind of guide line to help operators position the skip directly under the hopper. That will come with practice.
Honestly, that’s it. For now anyway. 
I can spend the the time between now and it’s first showing at Randolph Railroad Days October 20th and 21st practicing operation. This is a situation I’ve never been in before. I have a layout ready three weeks before a show. I always used to pull all nighters in the week before a ships getting ready. This feels most odd.


Friday, September 29, 2023

95%

Not much left to do

Is the layout 95% complete? 99% perhaps? I don’t know. All I know is that there’s pretty not much left to do. I sit in front of the layout and loose myself in it. Trains running or not. 
As you know, in the past few days, I was very frustrated with the tipper actuation rail. So I worked on other things to take my mind off it.
The first sector plate cassette has been built. It was made from 3mm aviation modellers plywood. On reflection this might be a little too thin and I’ll build the next one from something a bit thicker.
Plywood base and strip wood sleepers match the rail height on the layout perfectly
The cassette was painted grey fading into black to match the fiddle yard. 
This makes it less noticeable as you can see in the top picture..
The layout lighting is now in place. I had been very impressed with the LED strips that James Hilton uses on his projects. I bought some from Amazon. Sixteen feet in length complete with dimmer controller for $16. It is also self adhesive backed and comes with clips to fix it in place as well. I shall use those and add a few more of my own as I’m pretty certain that glue won’t stay stuck forever. A dollar a foot and I only used 10 feet. A bargain for sure. The lighting is very even. I like it a lot
First fitting of the LED strip
Hidden behind the barrels at exit offstage is the bumper to return the skip buckets to their correct position. Making this was much easier than the tipping rail. You can’t see it, which adds to the mystery.
You can’t see the tipper rail, can you? In other matters, health and safety will surely have something to say about the spillage there. 
There it is
A backscene is still needed, and though the cloud scene in the pictures looks pretty good. It actually has a greenish tinge that is quite unattractive to my eye. I might search out a better sky paper, or I might go for a plain neutral blue grey like the cabinet.
The final thing is to find a novel way to tip into the wagons at shows. Right now I just spoon a material into the skip buckets through the chute. It works. But a shows something more entertaining should be used. Something like this would be perfect. But at 1:16 scale it might be a tad too large for the area it needs to fit in. Perhaps it could be converted and adapted to fit the site in front of the sector plate.
Anyway we keep plodding along. Like any marathon I run, the finish is in sight.

.


Monday, September 25, 2023

Tipping Talk Three

 The cliffhanger from the last post was intentional…

Things had gone pretty well with the tipping part of the sequence. But I had paid absolutely no attention to what was going to happen after the bucket had been emptied. The way I had set the rail up, it was fouling against the frame of the skip chassis, derailing it, as I shoved it past the tipping point.
"No problem." I thought. It would just be some simple twisting and bending of the rail until it cleared the frame. But it wasn't as easy as that. As I twisted the rail in one angle, it changed the slope so that the rail didn't tip the bucket any more. Another twist and it tipped the bucket too early, another and it tipped too late. All very frustrating. Then even more frustrating, the rail fractured and broke as a result of all the twisting. It was at this point I took a break and published the previous post complete with abrupt cliff hanger, I was that frustrated.
After a couple of cups of tea and a few pieces of Kendal Mint Cake, I felt refreshed enough to try again.  It took quite a while to get it right, but I got there in the end. I was also much more careful with my bending and twisting of the rail.
The redesign progressed slowly
Much testing was done with the tipper to make sure it functioned OK and that there was enough clearance. In fact, I’m still testing it out daily.
Test runs look good as you can see, and yes I still have to add a bumper to return the buckets to their proper position. I haven't decided quite where that's going yet as I like to see a short train of skips in the tipped position wending their way down the layout. 
I’m gradually feeing better about all the work I’ve done and all the problems I’ve been through. A chute is still a likely addition to stop any overspill, as you just can’t trust how the material will tip into the bin. 
One little detail I’m quite pleased with is the addition of the figure at the tipping point. He looks like he’s about to operate a lever to actuate the tipping mechanism.
Terry the tipper man.
So there we are, it has taken the better part of three days to get this working well enough. The hobby is full of ups and downs and I’ve just had my fair share.


*Fy Merlen Bach*

Winter is coming…The phrase that spawned hundreds of cringeworthy internet memes. To me it means that any model making I do will be confined...